You can follow along with these two workflow documents:
5 THINGS Post Production Workflow PDF
5 THINGS Distribution Workflow PDF
1. Pre-Production
5 THINGS sprang from my love of technology, but also the realization that the proliferation of creative tools has clouded the understanding of much of the underlying reasons for that technology. I also knew that this was a niche concept in a niche market, so I’d have to go it alone, so much of the workflows behind 5 THINGS come from me.
First, it starts with coming up with an idea. Something that not only interests me but is also a hot topic in the industry.
I also consult with Moviola, who has sponsored the series this season and also premieres the episode as a webinar once a month. Moviola wants to ensure that the episode topic is relevant to their viewers, so that gives me some framework to ensure the episode is applicable. The one webinar a month paradigm also gives me a timeframe to plan production and post-production by.
It’s then brainstorming time, writing out the 5 major questions of the video, along with ideas for b-roll for each point.
I have a word doc template that I then begin to populate with the ideas in a narrative and conversational fashion. I then simply start dragging my knuckles across the keyboard and grunt approvingly as the episode starts to take shape. This is what will become my script and teleprompter feed. Because much of what I talk about is reliant on exact speeds and feeds, it’s important that my tech info be as correct as possible, so I traditionally don’t ad-lib the episode as much as I’d like.
It’s also at this point that I’ll call on some industry friends – other creatives and technologists, and sometimes manufacturers, to discuss some of my viewpoints to ensure the info I’m pontificating on is accurate.
 Lastly, it’s time for the cutaways. Being raised on media, quite often my normal thought process recalls clips from movies and tv shows and many of the cutaways are simply a natural extension of my cognitive process. I can’t help it, it’s how I’m wired.
Put all of this in a blender, and I get six to ten pages of tech goodness.
Now, it’s time to shoot.
2. Production
I shoot 5 THINGS at my home office. A modest 13×13 room that allows me to do 5 THINGS on nights and weekends. However, a room of this size does present some challenges.
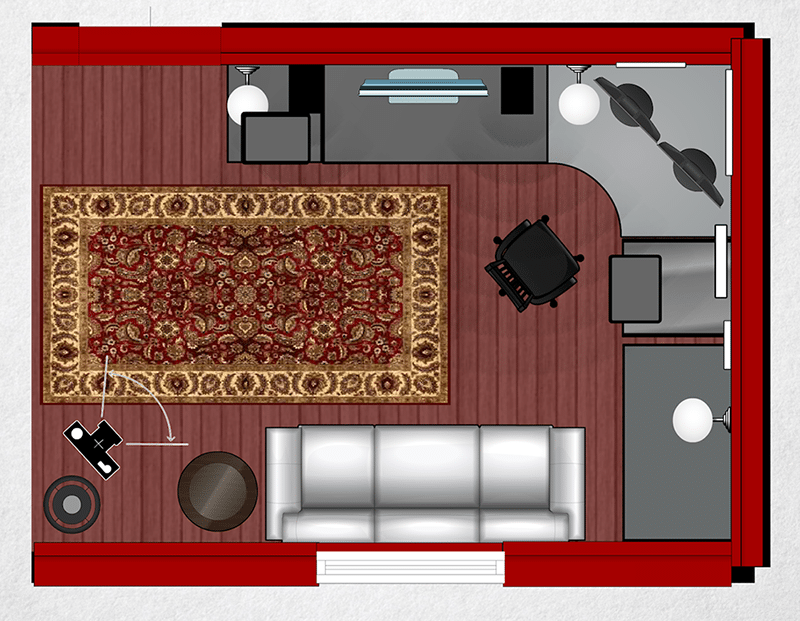
13″x13″ room layout; camera and light at bottom left.
First, let’s start with the look. Given the shortness of the room, having multiple cameras set up would be tricky. So, I decided to shoot with a 4K camera, and release in HD. This allows me to have a medium shot and a close-up from one camera. This also means my production lighting requirements were reduced, as I didn’t need to take into account lighting for other angles.
I wanted a shallow lens for a little bit of bokeh; a traditional video lens would have most everything in focus, and the frame would be very busy. The Sigma 1.8 18-35mm was a great choice. It’s also a fast lens so I don’t need a ton of hot lights in a small production space.
So, I needed a camera that could shoot 4K, and had removable lenses, and wouldn’t break the bank. I choose a Blackmagic Design Production Camera 4K.
Next was the teleprompter. Given the small size of the camera, and the less than constant use, I choose a modest prompter – the Flex Line from Prompter People. Easy to set up, and lightweight so I didn’t need a heavy-duty tripod. It’s also adjustable and had a large enough monitor that I could plug my laptop into it and run the prompter. Prompter People also has the Flip-Q software to run the teleprompter.
Prompter People also has a sister lighting company called Flo-light. The lights are very inexpensive, but not the most rugged. A 220AW, with some diffusion, and situated directly behind the camera lights my face just fine. It’s not as artistic as I’d like, but the room constraints somewhat limit my options.
Speaking of lights, I also have a 1500 lumen LED light behind me, a simple clip-on light to an old boom stand. This not only gives me a hair light, but the white ceiling becomes a great faux bounce card to illuminate the room.
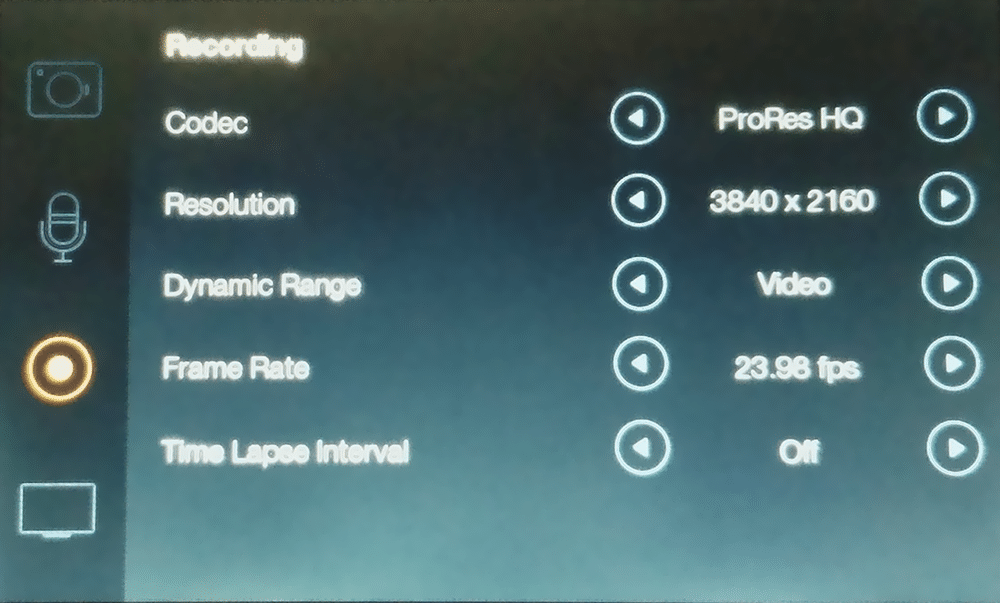
Blackmagic Cinema Camera Recording Settings
Now, because I am a one-man production band, I need to see the shot while I’m in front of the camera. I use the cameras HD-SDI out to an HDMI converter and run that that 27” computer monitor. This allows me to check framing, lighting, and that the camera is actually recording.
As for sound, I use a Sennheiser wireless lavalier mic transmitter and receiver and run the signal directly into the camera. As I do cut sound for indie projects on occasion, I do have some dampening up around the room. Sadly, it’s not enough, and if you listen to the audio version of this episode, or with headphones, you can still hear the slight reverb in the room.
Lastly, I gotta put on my face. That includes makeup.
 I then shoot, and the footage records directly to an SSD in camera. I record in ProRes 422HQ at UHD resolution at 23.98. I like the film look 23.98 gives, coupled with the short depth of field with the lens. Plus, most of the episode is a talking head, so there isn’t a need for a higher frame rate. As a fringe benefit, the media files take up less space and is easier to stream for viewers. As for dynamic range, I shoot in a video look as opposed to film, to reduce the amount of time in post spent on color.
3. Post Production
As yes, the warm bosom of post production. It’s home, ya know?
During this segment, feel free to follow along with this handy dandy post production workflow flowchart.
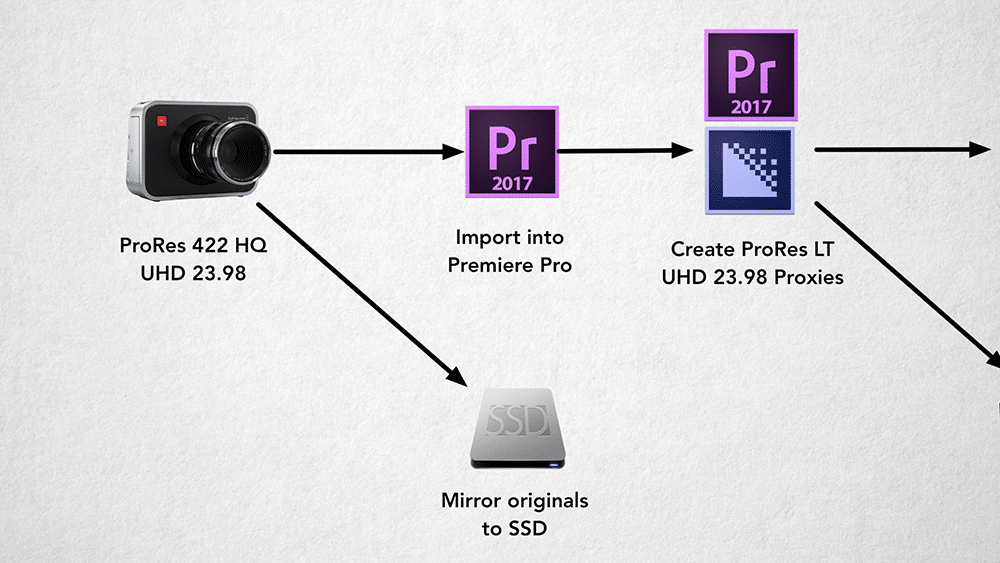
Ingest and Offline workflow for 5 THINGS
As soon as I’m done shooting, I take the raw camera SSDs and mirror the footage to a second SSD; for backup.
Once mirrored, I take a Premiere Pro template I’ve created for the 5 THINGS series and ingest the UHD ProRes 422HQ footage into the project. Given the newer proxy workflow in Premiere Pro, I no longer need to manually create proxies and relink during the online – Premiere does it for me. I flip the files to ProRes LT at UHD, maintaining the 23.98 frame rate. I’m often asked why I don’t offline in a smaller codec or at a smaller frame size. The answer is pretty simple: I don’t need to. The amount of footage is small enough that I don’t need to save a ton of space, and I like the UHD resolution so I know how much I can safely punch in for my HD deliverable. It also gives me the media format I’ll ultimately archive to.
What?!
Yeah, I wrestled with this decision for a while….but let’s be honest here, this is a web series. There is little reason I need to have uber high res masters of the raw footage after the episode is complete. My final output will be from the camera masters, and the need to go back to the originals is slim and none. Plus, archive storage constraints are always a concern. I would not recommend this for most folks, especially broadcast professionals, but for me, I was willing to live for the quality tradeoff for archival material.
By now, the proxies are created, and I transfer them to a several-year-old (and soon to be retired) Synology 1512+ 20TB NAS. This offers me a backup of the media and redundancy in the event a drive fails. I also keep the raw media on the SSDs until the project is done. I also put the proxies and portable bus-powered SSD – a 500GB Glyph; this allows me to edit anywhere, easily.
 My main edit system, until recently, was a 2013 MacBook Pro. It had an nVidia GeForce 750M GPU, and had 16GB of RAM. Starting with this episode, I’m using a new 2017 MacBook Pro with a CalDigit USB-C dock.
I’d run the HDMI out to a consumer 42” UHD monitor, which I used a Spyder Pro to calibrate the color on.
I can now begin to select my takes and assemble my cut. I mark my good takes in Premiere and do a string out.
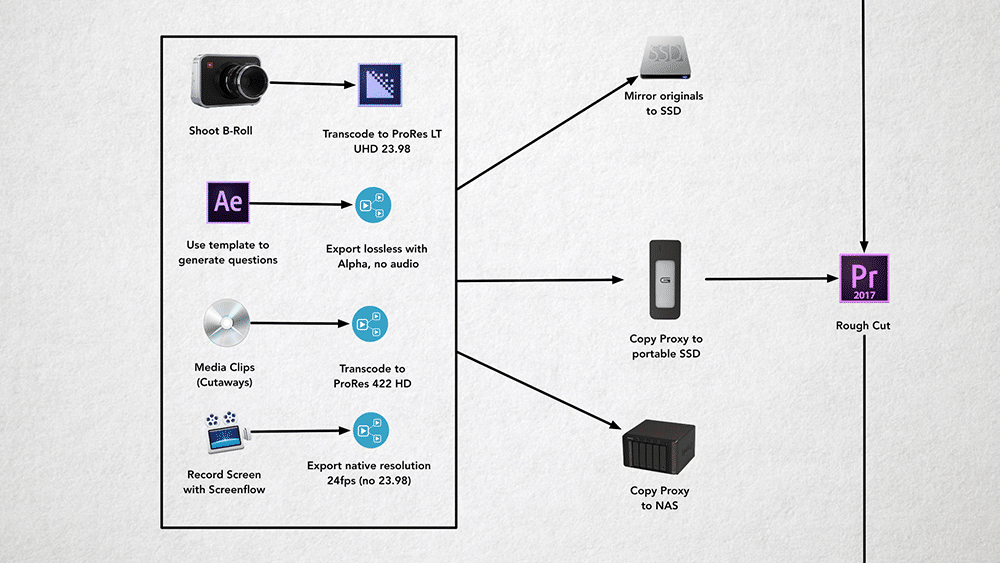
Supplemental Media Workflow for 5 THINGS
Once my talking heads are strung out, I go into After Effects and generate the questions before each segment, as well as the lower third factoids. I attempted to work with the Live Text option from After Effects to Premiere, but too often I found I needed to adjust the parameters of the text that live text didn’t give me options to. So, I do the questions and lower thirds in After Effects, and export them with an alpha channel, then use them in my Premiere sequence. I also use Light Leaks from Rampant Design as transitions between segments.
 Next, I track down the film and TV cutaways I need, and re-wrap them with a Quicktime wrapper or flip them to a more edit-friendly format. This is also the stage where I’ll incorporate footage or effects from other NLEs. I’ll also use Telestream’s Screenflow for screen recordings. ScreenFlow allows me to zoom in to screen recordings without much loss in quality, so I can point out features or details in whatever I’ve recorded. I’ll also use Boris FX Sapphire plugins for the dirty video effects. Sapphire plugins are very intensive, so having all of the media in a more edit friendly format makes previewing the effects that much easier. Of course, during this time, I’m backing up all of my media up to their respective data parking lots.
Once the rough cut is done, I render the sequence and export a ProRes file using the rendered previews. Why? Using previews allows me to go back into the sequence and make changes and fix mistakes without having to re-render the entire sequence during export.
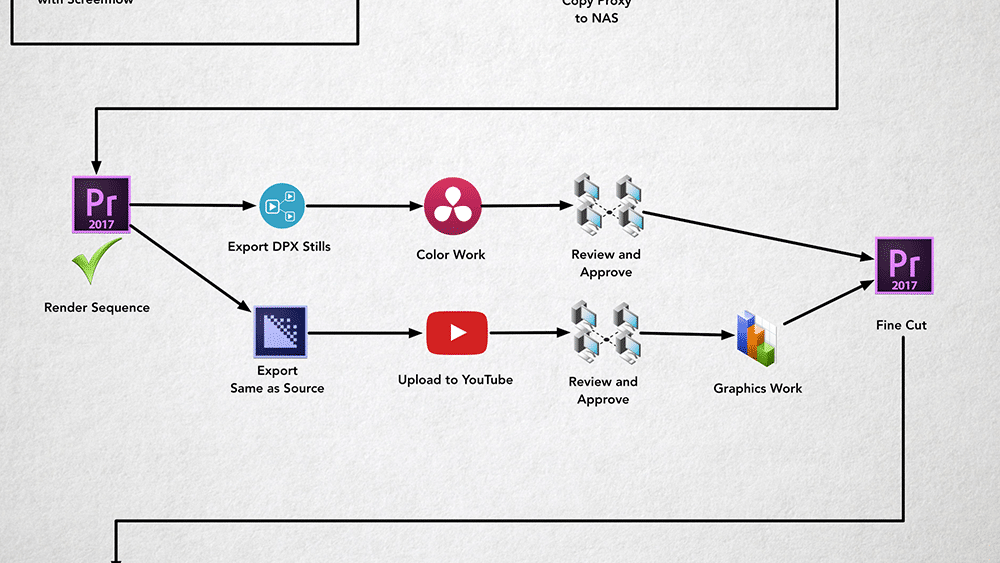
Color and Graphics work workflow
After the render, I’ll export the sequence in Adobe Media Encoder, same as source, and upload it to YouTube, as unlisted. Why? Rendering to an h.264 takes up a lot of CPU resources. I want to continue working. Same as Source is a quick export, h.264 is not. YouTube will take ProRes files no problem, the upload will just take longer and in the background.
I then share this unlisted link with my friends at Moviola for input, as well as for Thomas, the motion graphics dynamo at Moviola, so he knows the timing for his motion graphics. Thomas will do 3-5 motion graphics per episode if needed, to add a bit more eye candy than just my overactive hand movements.
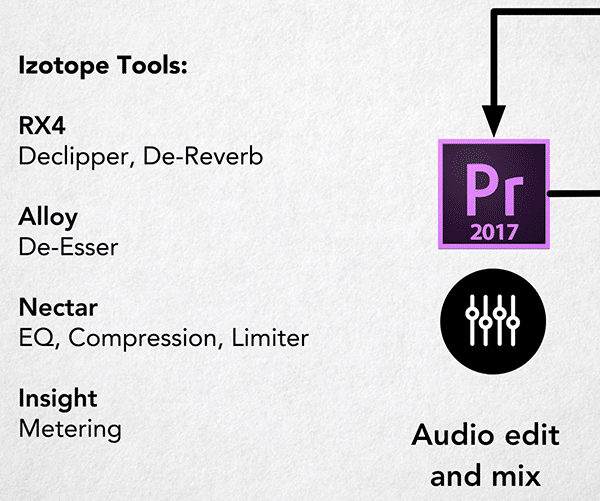
Izotope tools used in 5 THINGS
Color is not one of my strong suites. Because of this, I’ll often enlist the help of Jason Bowdach at Cinetic Studios to do a corrective grade on my talking heads. I shoot him over a few DPXs of my talking head, and he rescues me from the daredevil red hue that comes from this room.
I use several Izotope tools for any audio cleanup I may need, and to EQ and compress my audio for ease of listening.
It’s now time for the conform, and the proxy workflow in Premiere makes this very easy. I simply toggle from low res to high res, and just as before, I’m ready to render.
I take the rendered sequence and export the cut from Adobe Media Encoder using Previews, and I now have my master file.
4. Distribution
 This is where things get really hairy, and where I spent a huge chunk of time, and I would kill to automate this. During this segment, feel free to follow along with this handy dandy distribution workflow flowchart.
I currently have 5 distribution points for 5 THINGS: Moviola, YouTube, my website, Roku, and iTunes.

Distribution via Moviola Workflow
Moviola is relatively simple. I generate an h.264, using a slightly tweaked Adobe Media Encoder YouTube 1080p preset. Moviola has a proprietary VOD platform, so the best I can do is give them a high-quality file delivered via the web that they can work with. Moviola handles all of the metadata for their system.
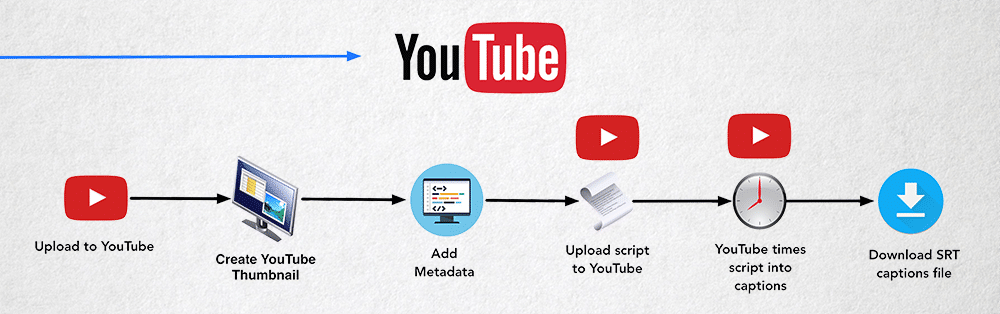
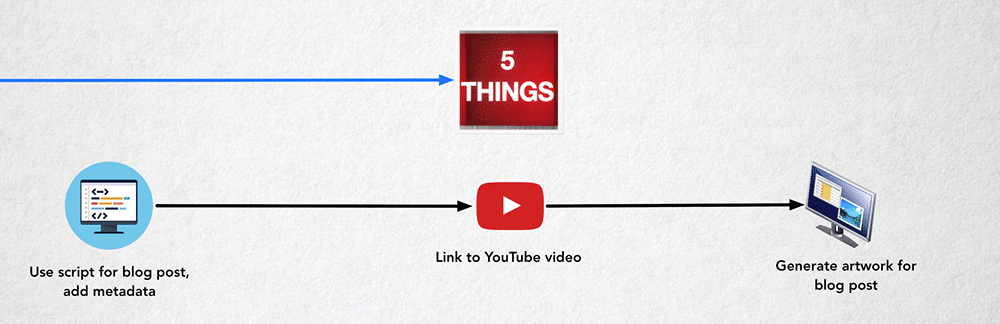
YouTube, as I mentioned earlier, gets a ProRes file. While this lengthy upload happens, I start to work on thumbnail artwork, which will become the basis for every distribution platform. I’ll also begin to enter in metadata on YouTube and do some research on what kinds of keywords are working for similar videos.
I’m a huge proponent of education and being accessible to as many people as possible.
To this end, I ensure 5 THINGS gets captioned. It also reportedly helps with S.E.O., although to what extent I don’t know. I have a workflow hack that gets YouTube to take your script and time it to your video for you; free. This becomes your captions. After YouTube times the captions, I download the SRT caption file, as I’ll be using it for all subsequent encodes.
5 THINGS website workflow
I then take the transcript of the episode and use it as the basis for a blog post at staging.5thingsseries.com. This allows a visitor to read the information in the event they don’t want to watch or listen, as well as, again, being good for S.E.O. I take screen grabs from the video to punch up my potentially dry transcript. As the video is already on YouTube, I simply embed the video at the top of the blog post so viewers can watch on my site or on YouTube.
Roku Workflow for 5 THINGS
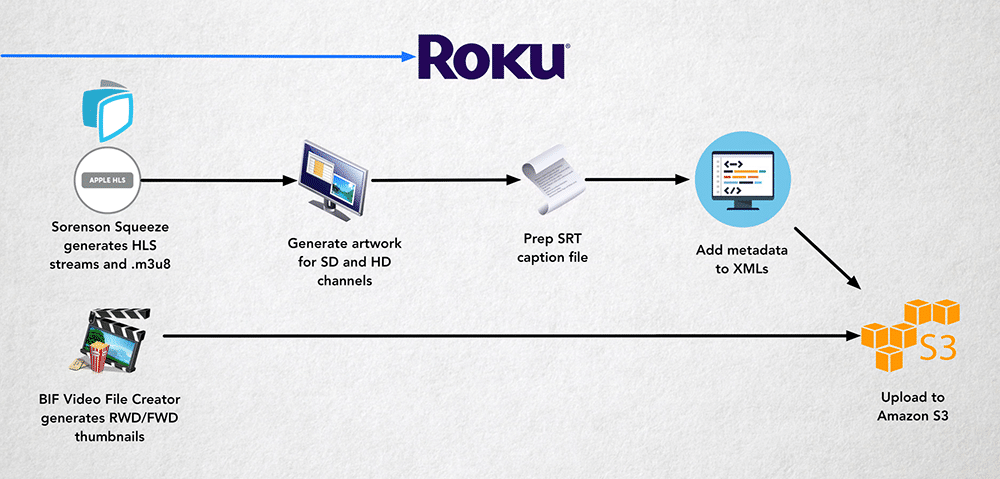
 Now Roku is a difficult beast. As Roku is finicky about channels linking to YouTube videos, I need to go to the lengthy process of creating streamable media for my Roku Channel. I choose to go with Apple HLS for the streaming media format for Roku as it’s the most flexible and forgiving on various platforms. This generates segments of each episode in varying degrees of quality, so the end user’s player can automagically switch between resolutions depending on their available bandwidth.
Generating this media format – plus the m3u8 manifest file – is something not a ton of encoders do easily. I settled on Sorenson Squeeze, because it creates the media and generates the m3u8 playlist file. However, there is a slight gamma shift, which means I need to do some small tweaks to the color on encode.
BIF files for Roku
This is obviously not ideal. Tests with earlier versions of Compressor 4 yielded several errors, so when time permits I intend to experiment with newer versions of Compressor to streamline the process and to potentially move from Sorenson to Compressor.
While the encode is happening, I take the master ProRes file and run it through a little program on an aging PC called BIF Video File Creator. A BIF file, or Base Index Frame, is a file that Roku uses to show thumbnails of frames as you rewind and fast-forward through the episode. It’s a little eye candy that makes scanning through an episode easier for the viewer.
For graphics, I take the thumbnail that I created for YouTube and resize it to fit the graphics requirements for my standard definition and high definition Roku channel.
5 THINGS Roku Channel
My Roku channel pulls all of its data from external resources via XML. This makes it easier to update, and easier to use a 3rd party media host like Amazon S3. Thus, I need to hard code the episode metadata into the XMLs, as well as then link to the media, caption files, and thumbnails of the episode. I then upload all of these files to my Amazon S3 bucket.
It’s then Q.A. time, and I load the channel up on both my Roku 3 and Roku 1 to ensure HD and SD look and play in an acceptable manner, and that the thumbnails, captioning, and BIF files perform as expected.
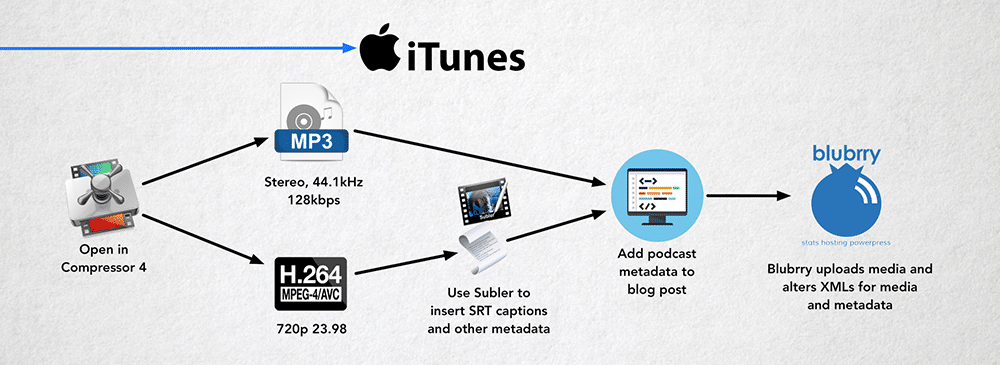
iTunes workflow for 5 THINGS
Next, it’s iTunes, which is a new addition for 5 THINGS, in fact, it may still be under development when this episode premieres. I have 5 THINGS as 2 podcasts – 1, the video as you watch now, and 1 that is just the audio portion of the episode, as I’ve had requests from folks who want to listen on car rides or during other activities where watching isn’t possible. I use Compressor to generate the 720p h.264 files for the video portion, as well as the MP3 version for the audio podcast.
I use a great app called Subler to insert the SRT caption file into the 720p podcast file, as well as insert the plethora of metadata into the file.
 BluBrry has a fantastic WordPress plugin that maps metadata from your blog post directly to iTunes. This allows me to upload my iTunes media to Blubrry and have 1 place for the metadata to pull from for both podcasts… so at least that portion is somewhat automated.
5. Improvements
There is always room for improvement… and so there are several things I’d change.
One is more dynamic lighting, rather than just a boring, and somewhat evenly lit and occasionally blown out face.
I’d also love even more motion graphics to illustrate the tech talk I’m making on camera. Less of me, more of the things I’m talking about…without a basic slideshow or a Ken Burns effect over a still image.
Automation for distribution is a biggie. The various platforms all requiring specific media formats and metadata. Most online distribution platforms that connect to these VOD outlets are really not meant for the indie person such as myself, so a 3rd party service really isn’t in the cards for now.
Lastly, I wanna work with you. Wanna be a part of 5 THINGS? Hit me up. Episode suggestions, comments, or offers of collaboration are always welcomed.
Have more workflow questions on the web series? Maybe some improvements? Ask me in the Comments section. Also, please subscribe and share this tech goodness with the rest of your techie friends.
Until the next episode: learn more, do more.
Like early, share often, and don’t forget to subscribe. Thanks for watching.
Thanks for that very complete and open look behind the scenes. Lots of work. A couple questions: Who runs your prompter? And how do you approach rights for cutaways–has anybody ever said running a credit wasn’t enough and asked you to pull it?
Hi Chris: Good Questions. I run my own prompter, via my laptop. My laptop is about 5 feet away. I hit record on the camera, hit a spacebar on the laptop to start the prompter, and then get into position and pontificate. The downside is that if I want to ad-lib, add pauses, etc, I don’t have as much flexibility, as the prompter is running at a constant speed. This means I may have to do multiple takes to get a complete delivery thats good. I cut this tidbit out of the episode, but I normally shoot at a 3-4:1… Read more »