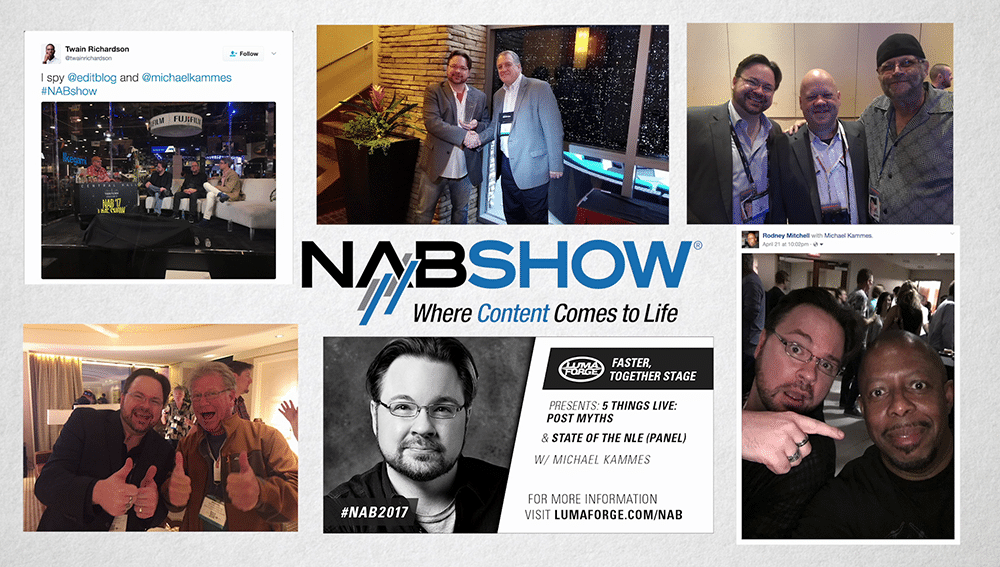
Great to meet-up with folks at NAB 2017!
We’re back after a break for NAB. I’m still regaining my voice, and wanted to thank everyone who stopped and chatted with me at NAB….as well as attended or tuned in to the panels I was a part of plus the live episode of 5 THINGS thanks to Lumaforge. To everyone who reached out and chatted at the show, you ROCK. I love hearing from you. PLEASE, stay in touch.
Snap back to reality, and today we’re delving into what certainly sounds like a good topic, Prepping for post audio.
1. Track Layouts
How much time have you spent cleaning up problems and mistakes from onset? Or from other editors on your project? Often, audio folks have to do the same thing. Reorganizing work from the creative edit is usually the first step in post audio. You can help alleviate this in a few ways, and it will help you in your rough mix.
First, organize your audio. I know when it comes to video, you traditionally checkerboard your video, collapsing into as few tracks as possible. But when it comes to audio, we want extreme separation and organization. This means separating audio into the minimum of 3 categories, and thus sets of tracks.
In post, we call these FX, MX, and DX, or Effects, Music, and Dialogue tracks. This is a good start, as audio folks routinely need to create stems, or isolated mixes, of each individual sound type. What is typically preferred, however, is to arrange even deeper. This would include audio tracks for each character’s dialogue, and separate tracks for voice over.
It may also include organization by sound effects types, like soft effects…such as ambiance, vs. hard effects, like a door slam. Not only does this help post audio, but it does allow you in video post to easily find and change the audio without soloing and hunting around for the right piece of audio.
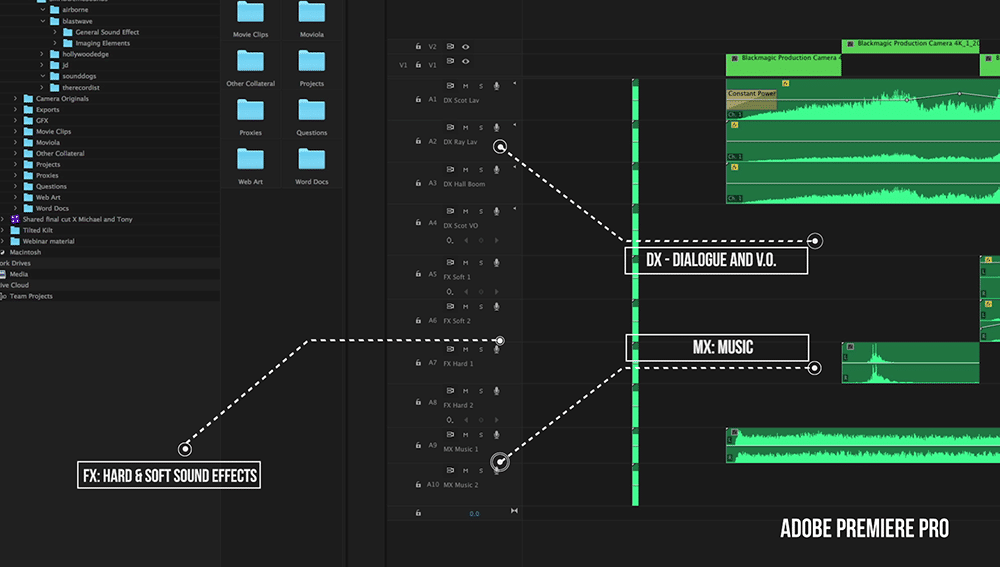
Track labels: DX (Dialogue), FX (Hard and Soft Effects), and MX (Music)
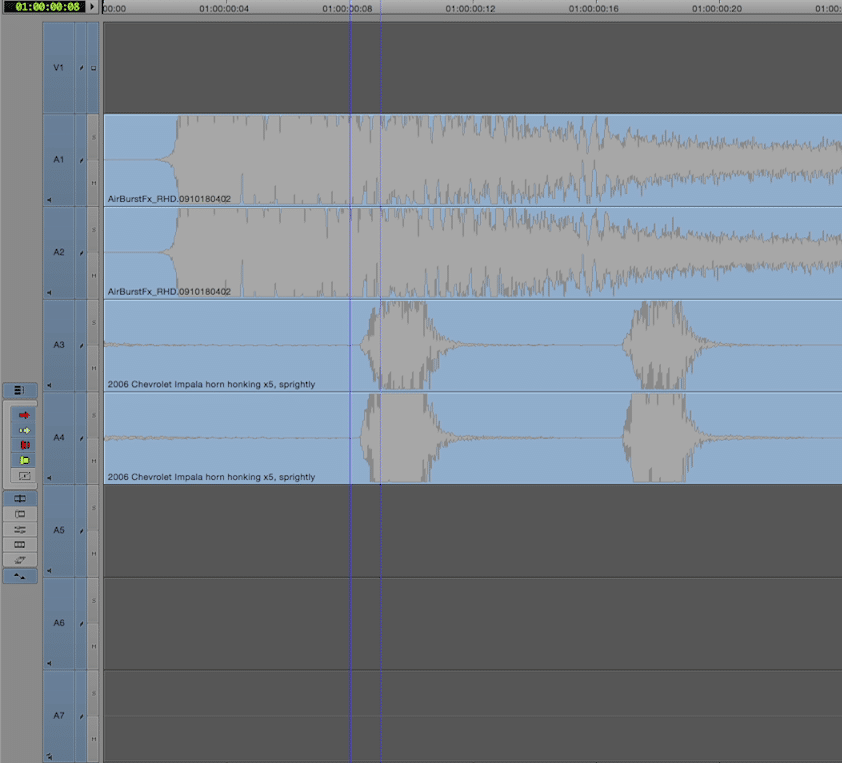
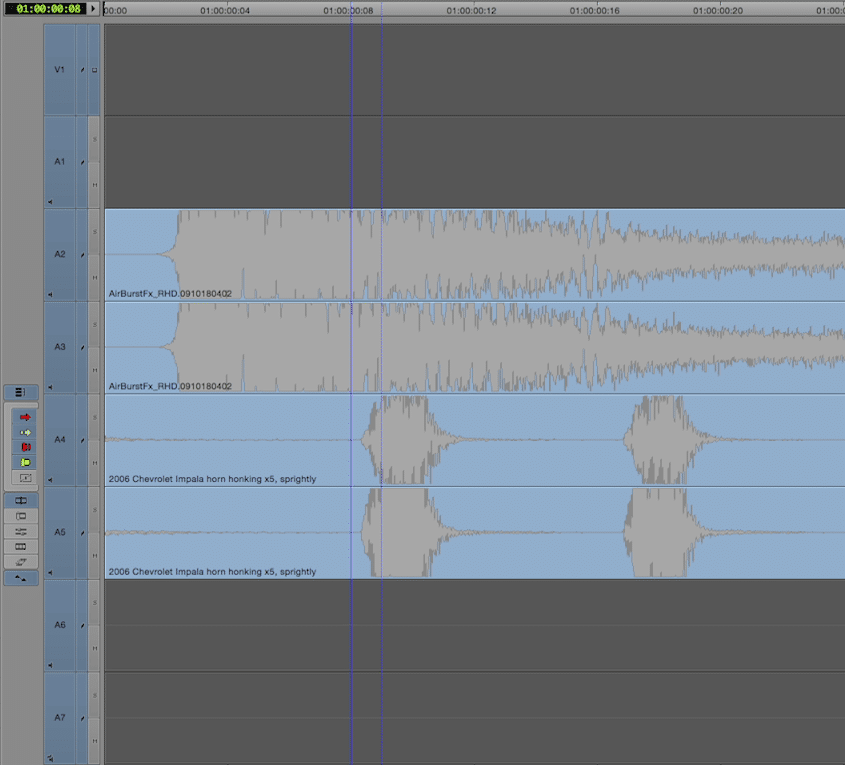
What should also be done is to adhere to odd-even pairing. This means putting stereo tracks on tracks 1 and 2, 3 and 4, and so on.
Correct audio track layout: odd-even pairs
Avoid even-odd pairings, such as tracks 2 and 3, and 4 and 5.
Incorrect audio track layout: even-odd pairs
This also includes not putting mono files on stereo tracks.
As an aside, nothing is wrong with having stereo tracks and mono tracks in the same sequence.
Lastly, if you process or render any audio files – whether you send them to another application, or simply apply a permanent effect, don’t forget to leave the original on the timeline with the volume down or muted. If you export the sequence for post sound and have rendered effects, the sound folks are then stuck with your permanent mix, which may need to be changed down the road. It’s like you getting a compressed video and having little way to get back to the original file. In fact, many audio folks will simply skip your effects entirely by ignoring them when importing them into the audio session.
Help the entire project out and keep the original around. Be cautious when using tools like Plural Eyes to sync audio, often using this tool to sync second system audio can remove the original audio for the scene….and your sound folks may need access to that.
2. Video and Audio Sync
Sync, sync, sync. You fickle mistress. Sync is a problem that will have you chasing your tail. Here are a few things you can do to ensure your sync is spot on.
First, is a head pop or a two pop. I’m sure you’ve all see the countdown to 2 before.
History lesson: It used to be used when audio existed on magnetic tape stock, and the picture was on celluloid. Getting these 2 mediums to proper and consistent playback speed could be challenging, so this countdown – called the academy leader – was placed ahead of the film. The audio – a single frame long 1kHz tone – was placed on mag stock to be audibly heard for 1 frame when the picture showed a frame of 2. If the tone and frame of 2 didn’t match up, something was out of sync.
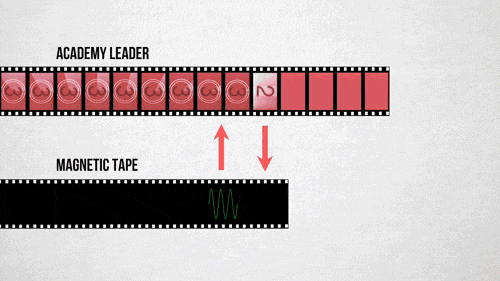
Dual System Film Sound Sync
Why have the pop at 2 you may ask? This was because the FFOA or FFOP, also known as First Frame of Action or Picture, started 2 seconds after the pop.
At the tail end of the film, an identical pop was placed 2 seconds after the LFOP or LFOA – which is the last frame of action or last frame of picture.
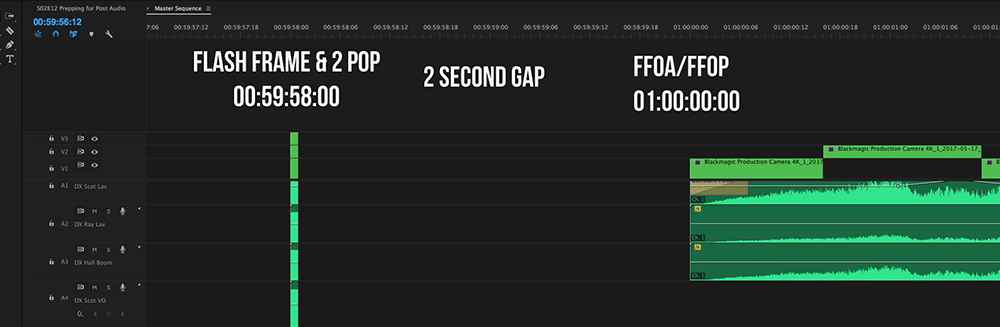
While we no longer need to be as concerned about dual system playback, we still need sync points to ensure exports are OK and remain in sync. Often, this can simply be a flash frame 2 seconds before FFOA with a 1kHz tone, and the same flash frame and pop 2 seconds after the LFOA. Usually, your project will have the 2 pop at 00:59:58:00, with FFOA at 1 hour.
Traditional audio and video track layouts for sync.
3. Video Export
Most everything that post audio does is based off of mix to pix. So it’s imperative that the video arrives to your audio team with a few key things.
First, as I mentioned in the last point, make sure you have your flash frame or academy leader countdown at the tops and tails of your piece.
You’re gonna have to put a time code window burn on the video for sync. Now, this timecode needs to match the sequence timecode and frame rate. Make sure you’re using a timecode reader filter set to sequence timecode, and not a timecode generator, or a reader that is pulling clip timecode.
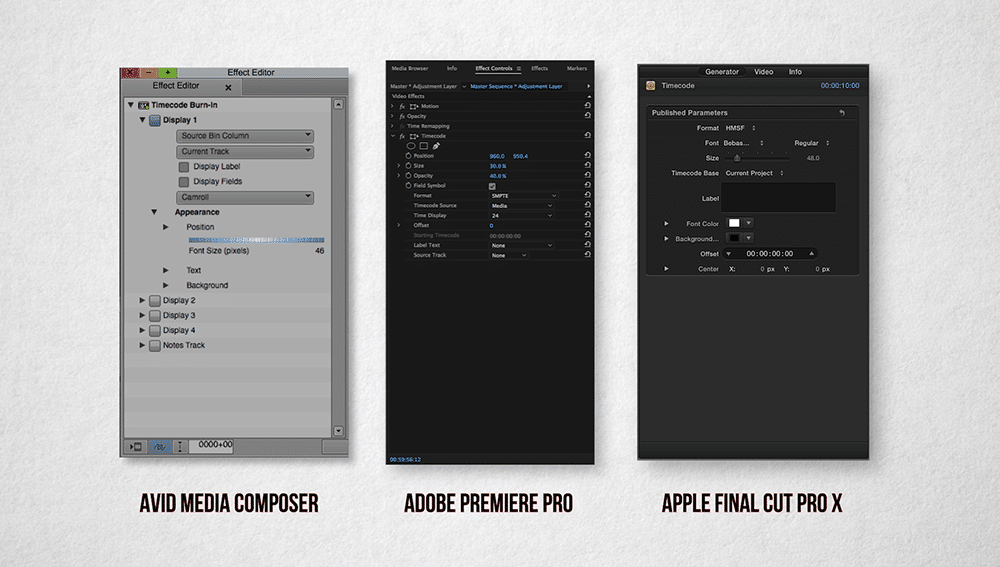
Timecode filters and effects in Avid, Premiere, and FCP X
Put the time code window burn in a place that will not prevent the sound editors or foley folk from judging footsteps, and lip sync. Often, this means having the window burn near the bottom or top of the frame and off to one side, often with a level of opacity. If the video is letterboxed, then put the window burn in this black area. This is important: be sure to check with the sound team to see their exact requirements.
Timecode window burn suggested placement, with opacity
Now, when you export the video for post audio, each facility will have their own requirements. Normally, this is a DNxHD or ProRes export. These files will be larger than h.264 files, but post audio systems work best with non long GOP encoded files – so the less compression, the better. We want the audio workstations horsepower to go toward mixing, not trying to play back the video file. Most facilities are still mixing to SD or HD video, as opposed to 4K or larger. Again, we want to minimize strain on the DAW.
It’s also beneficial to export the video file with the complete mix you’ve done. Audio folk will often use this as a guide, as often it gives us insight into what the director liked for that sequence.
4. OMF and AAF Exports
Most NLE’s have the ability to export the sequence for post audio. This is usually in an OMF or AAF format. OMF, or Open Media Framework, is an older, dated format, and has several limitations. OMF tops out at a 2GB file size, which often means you need to export multiple OMF files for larger projects. OMF also loses the volume automation and names of the tracks when exporting and importing from one application to another. AAF, on the other hand, remedies all of these issues. Use AAF whenever possible.

AAF export settings with 5 second handles in Premiere Pro.
If your NLE supports nesting of sequences, then you’ll want to un-nest these portions of your timeline. The OMF or AAF that contains a nested sequence will do a “mix” of that nested portion, and post sound won’t get the individual sound files.
Needless to say, this is very, very, bad.
Post sound will also want handles – that is, extra head and tail on the clips that are exported. This helps with fades and smoothing out audio from clip to another. I prefer 5-second handles if possible. This is easily selected during the OMF or AAF exports from your NLE.
For those of you using FCP X, you have a bit more work ahead of you. First, you need to properly assign your roles. Next, FCP X doesn’t export OMF or AAF natively. But, you have a few options to work around this. Most common is to use the X2Pro application. There are 2 flavors, X2Pro, and X2ProLE, but I highly recommend the full version. It works by exporting a fcpxml from FCP X, and running this file through the X2Pro application.
The other workaround is to use Logic. If you have Logic on your Mac, you can export an XML from FCP X, open this exported XML in Logic, and Logic can export an AAF for post audio…so this workflow may result in the loss of some very important metadata.
5. Odds and Ends
Just as editorial should have tight communication with production, post audio should have tight communication with you. Talk with them early, and make sure to ask for their deliverables doc. Send them notes on problematic scenes, notes on temp audio, music, etc.
What’s also beneficial is to put room tone on the tracks for that scene. While not imperative, it does save time in post audio from having to hunt down bits of room tone from within dialogue takes.
Dialogue, a vast majority of the time, will be mono. There is no need to double up mono dialogue tracks to create a faux stereo track in video post. If production used lavs and a boom, keep them mono in the timeline so post audio can use both at their discretion.
Check and see what type of system audio post is using. Is it Mac based? Is it Windows? This will help determine how to format the drive you are handing off to them, so they can actually read it. Or, do they want the media via online sites, like Dropbox or weTransfer?
Check your output before you hand it off, and compare it to the deliverables doc. Does the timecode of the window burn match the sequence timecode – at the start and at the end? Did you include a reference mix? Did the post sound facility request you export your feature in smaller chunks? Double check to minimize downtime due to mistakes.
Have more prepping for post audio concerns other than just these 5 questions? Did I miss something? Hit me up in the Comments section. Also, please subscribe and share this tech goodness with the rest of your techie friends….especially at parties.
Until the next episode: learn more, do more.
Like early, share often, and don’t forget to subscribe. Thanks for watching.
Special Thanks: Charles Dayton, and the Sound Design Facebook Group.
X2Pro and FCPX footage: MacBreak Studio Ep 334- Final Cut Pro X to Logic Pro X
Specifying the mix(es) you want in return is very important if you are distributing internationally. That way you can dub in the dialog tracks without affecting the music and SFX.
Nice addition – thanks for watching / reading!
[…] post workflows beyond some basics. Aside from Andrew’s document I’ll also point you to this page from Michael Kammes for some more tips, as well as some links at the […]
[…] put up workflows past some fundamentals. Apart from Andrew’s doc I’ll additionally level you to this web page from Michael Kammes for some extra ideas, in addition to some hyperlinks on the […]
[…] post workflows beyond some basics. Aside from Andrew’s document I’ll also point you to this page from Michael Kammes for some more tips, as well as some links at the […]