1. Transcoding to a better codec will improve quality

This is a very, very common question. It doesn’t matter what forum you contribute on, or troll on, this question is always asked. If I take my compressed camera footage, like an 8bit h.264, and convert it into a more robust codec, like 10bit ProRes or DNX – will it look better?
And it does topically make sense. If I put something small into something bigger, well, that’s better right? Unfortunately, the math doesn’t support this. Transcoding to a better codec won’t add quality that wasn’t there to begin with. This includes converting from an 8bit to a 10bit or greater source, or even converting from compressed color sampling value like 4:2:0 to something a bit more robust like 4:2:2.
Think of it this way.

Putting the same quality file into a larger file won’t make it visually “better”.
Imagine this glass of eggnog is sum quality of your original video. Adding rum or not is strictly your call. And you decide you want more of it. So, you pour the eggnog into a larger glass.
You’re not getting more eggnog, you’re just getting a larger container of the same amount of eggnog, and empty space not occupied by your eggnog is filled with empty bits.
What transcoding will do, however, is make your footage easier for your computer to handle, in terms of rendering and playback. Less compressed formats, like ProRes and DNX are easier for the computer to play than, say, an h.264. This means you can scrub easier in your timeline and render faster. Now, this is mainly due to long GOP vs non Long GOP which I discuss here.
In fact, if you wanna get REAL nitpicky, ProRes and DNX are NOT lossless codecs – they’re lossy, which means when you transcode using them, you will lose a little bit of information. You most likely won’t notice, but it’s there…or should I say, NOT there?

Interesting read. Click here.
Now, there is some validity to a unique situation.
Let’s say you shoot with a 4K camera. Perhaps it samples at 8bit color depth with 4:2:0 color sampling. By transcoding to a 1080p file, you can dither the color sampling to 4:4:4, and dither the sample depth to 10bit. However, as you’ve probably surmised, this comes at a loss of resolution – from 4K all the way down to HD.
More resources:
- CAN 4K 4:2:0 8-BIT BECOME 1080P 4:4:4 10-BIT? DOES IT MATTER?
- When 420 8bit becomes 444 10bit from Barry Green
- Discovery: 4K 8bit 4:2:0 on the Panasonic GH4 converts to 1080p 10bit 4:4:4
2. Log formats are the same as HDR

The two go hand in hand, but you can do one without the other. Let me explain.
HDR – when we talk about acquisition – Involves capturing material with a greater range of light and dark – stops – as well as color depth. It’s a combination of multiple factors. Shooting in a log format – whether it’s Slog, log-c, or another variant, is used to gain as much data as possible based on the limitations of the camera sensor.
So, let’s say you have a camera that only shoots in SDR – standard dynamic range – like Rec.709 – which has been the broadcast standard for almost 27 years.
But camera tech has gotten better in the last 27 tears. So, how do we account for this better ability of the camera within this aging spec? We can shoot in a log format. Log reallocates the limited range of the SDR of the camera’s sensor to the parts of the shot you need most. Log simply allows us to use more of the cameras inherent abilities.
So, while you get the extra abilities that the camera’s sensor allows, it doesn’t give you the complete HDR experience.
Now, if you shoot with a camera that isn’t constrained to Rec.709 and offers a log format – you now have the best of both worlds – greater dynamic range, and a format that allows you to exposure this extra realm of color possibilities.
3. You can grade video on a computer monitor

Color is a funny thing.
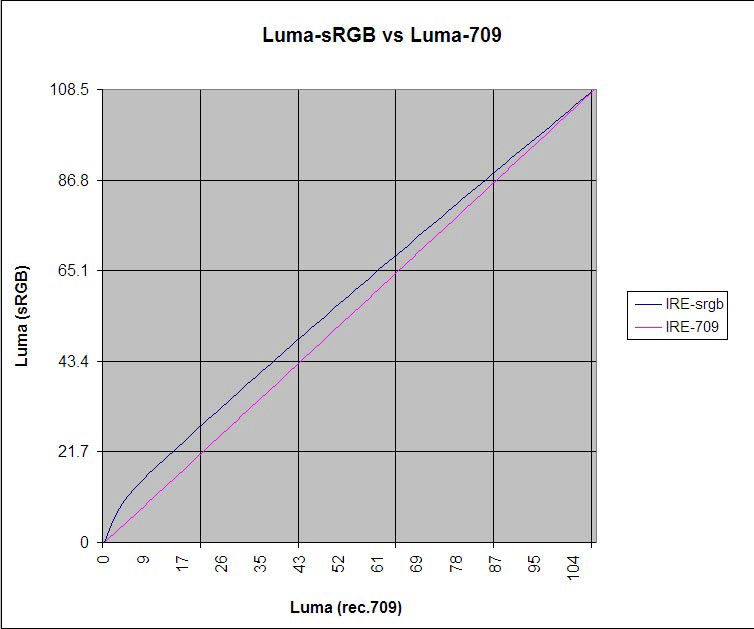
Luma of sRGB vs Luma of Rec.709
Oddly enough, it happens to change depending on what device you’re looking at it on. Imagine that? That’s why grading color on a similar device as to those who are consuming it is so important. So, it stands to reason that if you’re grading a TV show, you grade on a video monitor. If most of your views will be racked up on YouTube, well, then I’d grade on a computer monitor. To be more specific, it boils down to more than just color accuracy. Computer monitors don’t have true blacks as they are backlit, and many video monitors are moving towards OLED technology, which is not backlit. Also, their gamma curves are different – and this overall resultant contrast range is simply different from video monitors.

Color Management by OS
Sure, various computer monitors do have profiling to try and counteract this. Computer monitors are usually sRGB devices, while most video monitors are usually Rec. 709. And while their primaries are the same, we run into color management issues. With rec.709, you know what’s coming out on the other side of the pipe. When we introduce computer monitors, we’re not only dealing with the color management the OS is doing, but also the hocus pocus the computer monitor is doing to emulate video. That’s just too many cooks in the kitchen.
I’ll admit that given the split methods of consumption of media nowadays – that is, viewing TV shows online, and viewing web videos on your TV, it’s very difficult to get one grade to rule them all. On top of that, we have a wide variety of monitor types – from TFT and IPS LCD to LED to OLED to those aging plasmas. But the logic still stands – grade for the main medium your content will be consumed on…and then check the grade on the alternatives.
4. You can fix audio distortion


The camera sensor can’t handle all of the information; the sky is blown out.
The camera sensor can’t handle all of the information; the sky is blown out.
This happens commonly on location. The talent yells or talks louder, and the recording gets blown out.
The best we can hope to do is triage this – you’re not going to fix it. Well, why is that, Michael?
When dialogue is overmodulated, the incoming signal is too powerful for the device recording it. This means that the information you’re trying to record gets lost at peak values. Think of it in terms of video. Let’s say you set your exposure for a great shot of the ocean, but the sky is blown out – there isn’t much you can do to get that detail in the sky back. It’s simply too much information for the camera sensor to handle….much the same as audio overmodulation is for the device recording it.
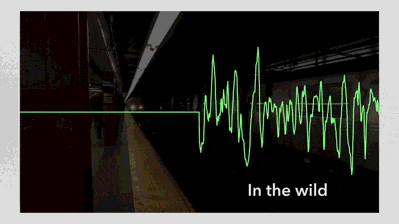
Take a look at the graphic above.
Here we see the audio as it occurs in the wild.
This is what it looks like after it’s recorded.
You can see the peaks – the high volume – is lost.
Now, if the overmodulation is slight, it may be partly salvageable.
Many audio plugins try and guess what information may have been lost during the clipping.
However, often the restored portion of the dialogue lacks clarity and detail and can introduce distortion. This then leads to the question, “does this treated clip sound better, or just sound different?”
It’s normally at this point in the conversation that one should start looking into alt takes or trying to reconstruct the words needed manually …and if enough of the dialogue is FUBAR’d, arrange an ADR session.
5. Storage is the same as capacity
Very often, I speak to those who tell me, “Well, we plan on shooting almost XXTB of material, so XXTB of storage should be enough.”
And while the XXTB number changes, the common assumption is the same – the storage you buy is the capacity you get. This is unfortunately not the case.
Let’s break it down.
Ever seen this notice on those hard drives you buy?
![]()

![]()
This is essentially accounting for the difference of 24 bytes between marketing 1 kilobyte and how large a kilobyte is in reality. It’s legalese…and for you number nerds, base 8 vs base 2 math.
For everyone else, this means you get 930GB available for every 1 TB. That’s a 7% loss before you’ve even installed the drive.
 And we’re just getting started.
Now, we want a RAID – that is, redundancy in the event one of our many drives fail. There is a sacrifice for this redundancy: space. The most common RAID formats in video nowadays are RAID5 and RAID6. RAID5 will consume 1 entire disk, and RAID6 will consume 2 entire disks. Obviously, this can be a huge bite in space depending on how many disks are in your array. If you have a basic 3 drive array, RAID5 will cost you 33% of your space. In a more common 12 drive array, you’ll only lose 8% of your storage. RAID6 will double that – again, you’ll need 2 drives.
But let’s go conservative so as not to scare you to much, and assume RAID5, and ballpark a 15% loss in space.
This puts our drive space at about 790GB free. We’re already 21% down!
Lastly, the best practice for spinning drive performance is to not fill the drive up past 80%. Performance hits are common after you eclipse the 80% capacity mark.
This brings our grand total to 632GB useable on a 1TB drive for best performance. That’s a loss of almost 40%!
……..
Have more post myths other than these 5? Ask me in the Comments section. Also, please subscribe and share this tech goodness with the rest of your techie friends.
Until the next episode: learn more, do more – thanks for watching.
Comments