1. What ways are there to create a Roku channel?
When I cut the cord a few years ago, I still needed to find a way to enjoy video media without simply relying on Netflix and YouTube. And buying many of the other subscription-based apps, like HBO GO, would simply jack up my monthly charge…which is why I canceled cable in the first place!
I looked at all of the OTT options out there, including AppleTV, FireTV, and various gaming consoles. Roku caught my eye as an inexpensive way to find and consume content, as it had thousands of public and private channels – much more than most others, and already a wide viewership. In fact, as of June this year, nearly 40 million Americans used their Roku at least once a month. It’s the #1 OTT platform out there. Roku has also just gone public, which means the company is going to accelerate even more quickly.
While I was thrilled with the amount of content I had easy access to with Roku, it wasn’t long before I wanted to get on the bandwagon and create my own channel for 5 THINGS.
The Roku channel paradigm is pretty simple. A channel is much like an EDL – it simply points to where the media is externally and streams it when told to play, so channels are traditionally lightweight, as they only contain few images, and code to link to your media elsewhere.
This seemed simple enough. However, when I started to create my own channel, there were only 2 ways to do it yourself.
First, was to use the site like instanttvchannel.com, which is a Cloud-Based Roku Channel Production System. Through a series of dropdowns and prompts, you could create your very own Roku channel. The problem I had was you had to pay per month as long as the channel was active, anywhere from $5 to $50 per month, and your account may have an InstantTV splash screen on launch, amongst other gotchas.
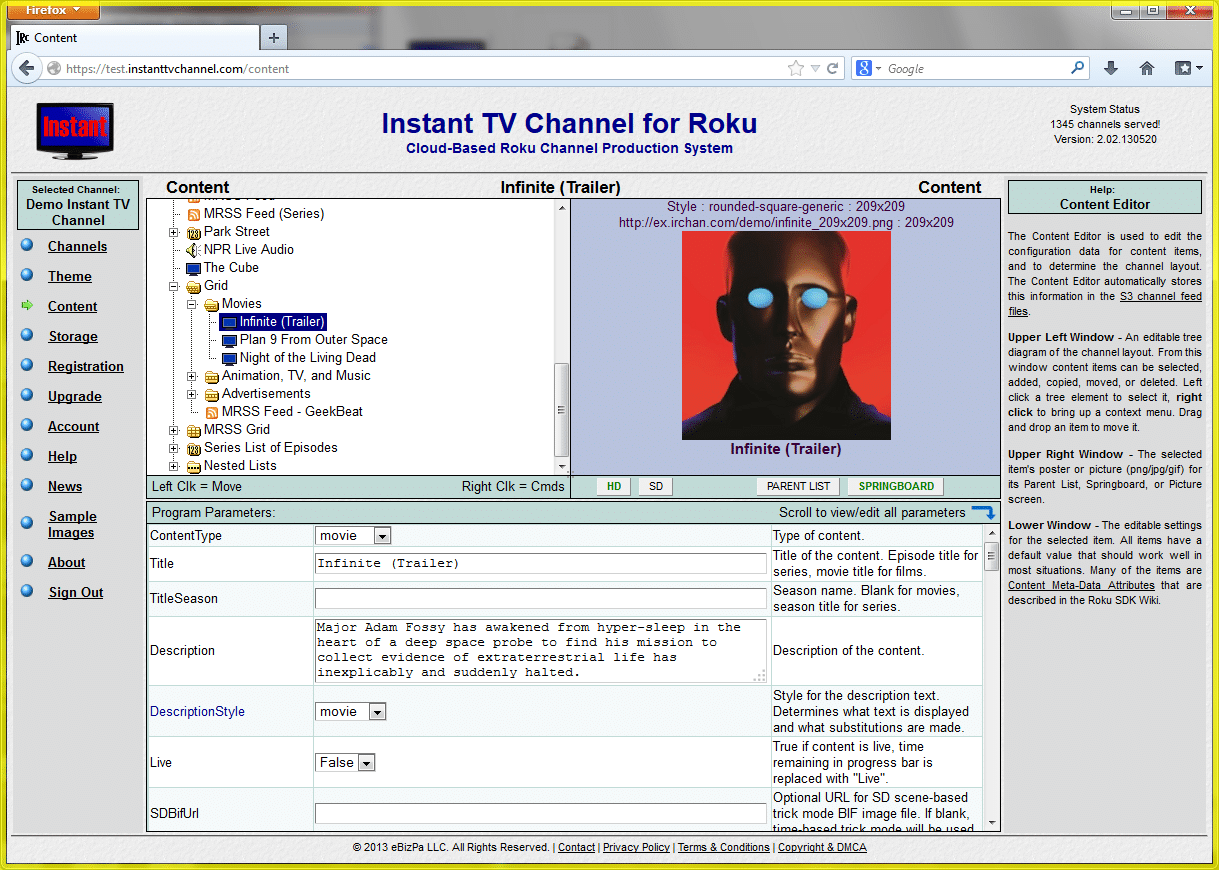
instanttvchannel.com
The second way was to develop against the Roku software development kit, or SDK. Programming for a Roku is channel is based around the BrightScript coding language, which is a bit like Javascript mixed with visual basic. Now, I could learn Brightscript and code from scratch, or, I could take some basic templates already configured for base levels of functionality and augment them as needed with modules of code.
So that’s what I did. It still relied on some coding and lots and lots of testing, and I spent a ton of time on forums and help guides. But it was the best choice since I wasn’t going to develop Roku channels full time. It took about 100 hours of work, and the purchase of an old SD Roku model for testing on legacy gear to get my first channel up and running.
And then there were the updates.
Several hours per month, after each new episode, and creating and testing versions for SD and HD Roku models.
But you fine folks are in luck. Last year, Roku introduced a 3rd way, known as “Direct Publisher”, which gave novice creators the ability to create a channel without writing a single line of code and have it work across most any modern Roku player.

Hallelujah!
And thus, how to create a channel with Direct Publisher is what I’ll show you today.
2. How do I use Roku’s Direct Publisher (walkthrough & tutorial)
Since Direct Publisher is from Roku, you need to start off by creating an account with Roku. If you already have a Roku unit, then you probably already have an account. Sign in.
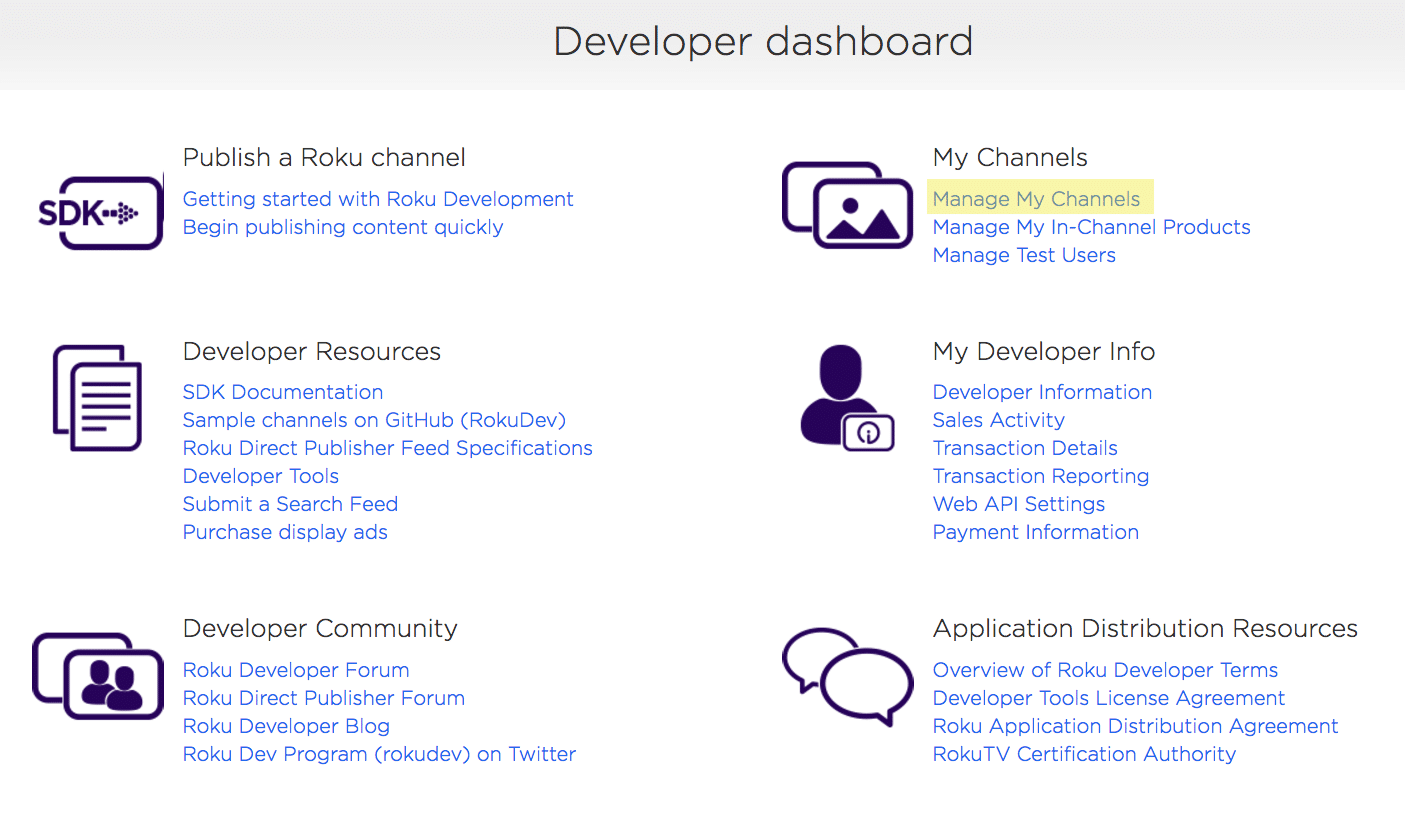
- Navigate to the developer homepage, and under “My Channels”, you’ll want to click “Manage My Channels”.

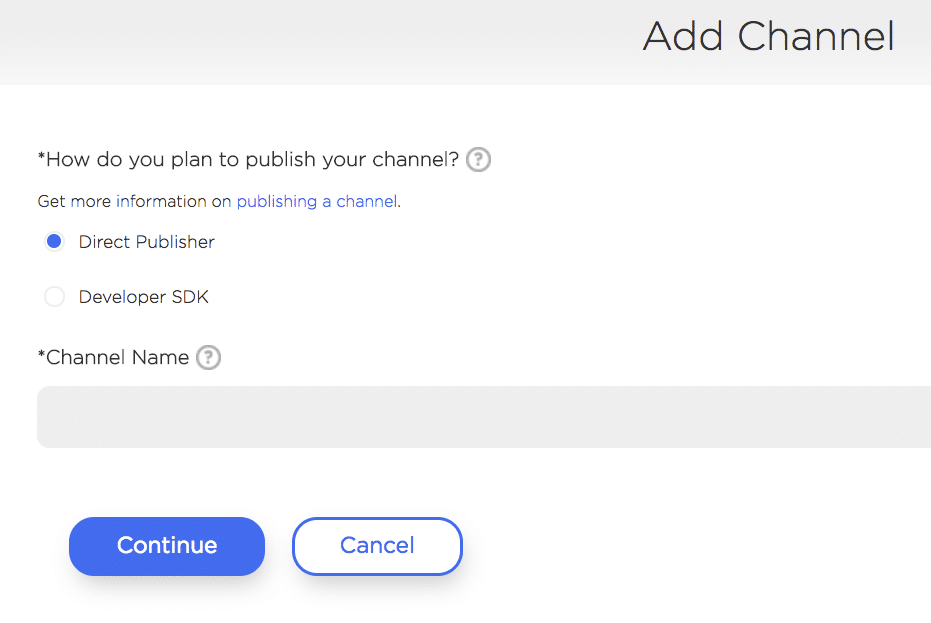
- Click “Add Channel”. As you can see, we have the aforementioned Developer SDK and Direct Publisher methods. You’ll want to select Direct Publisher, and give it a descriptive name, and click “Continue”.
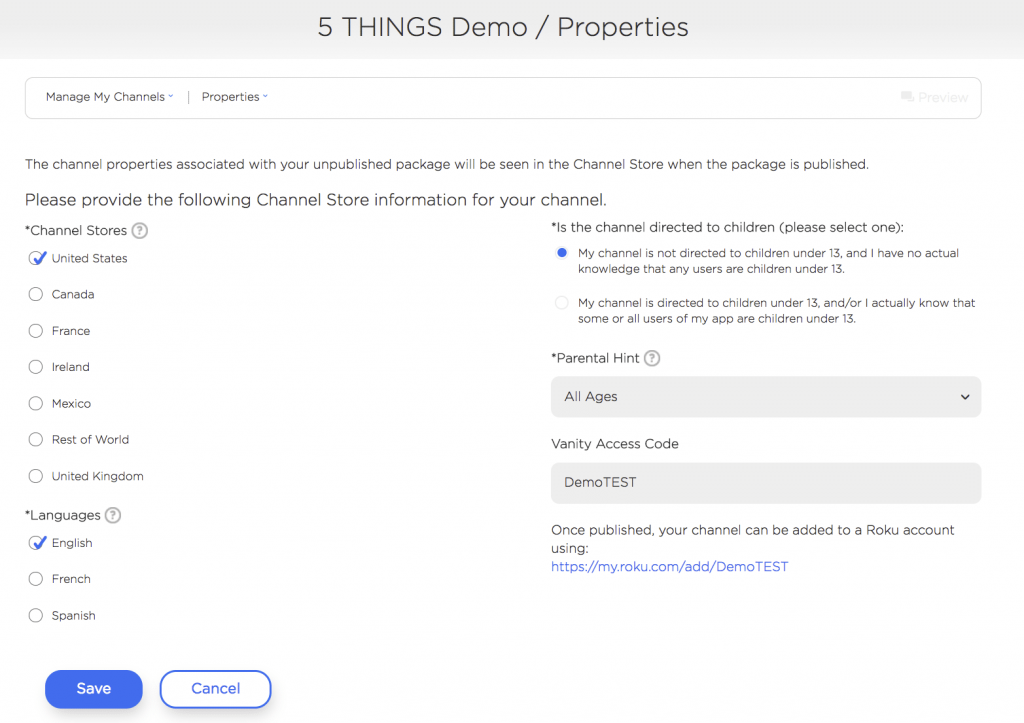
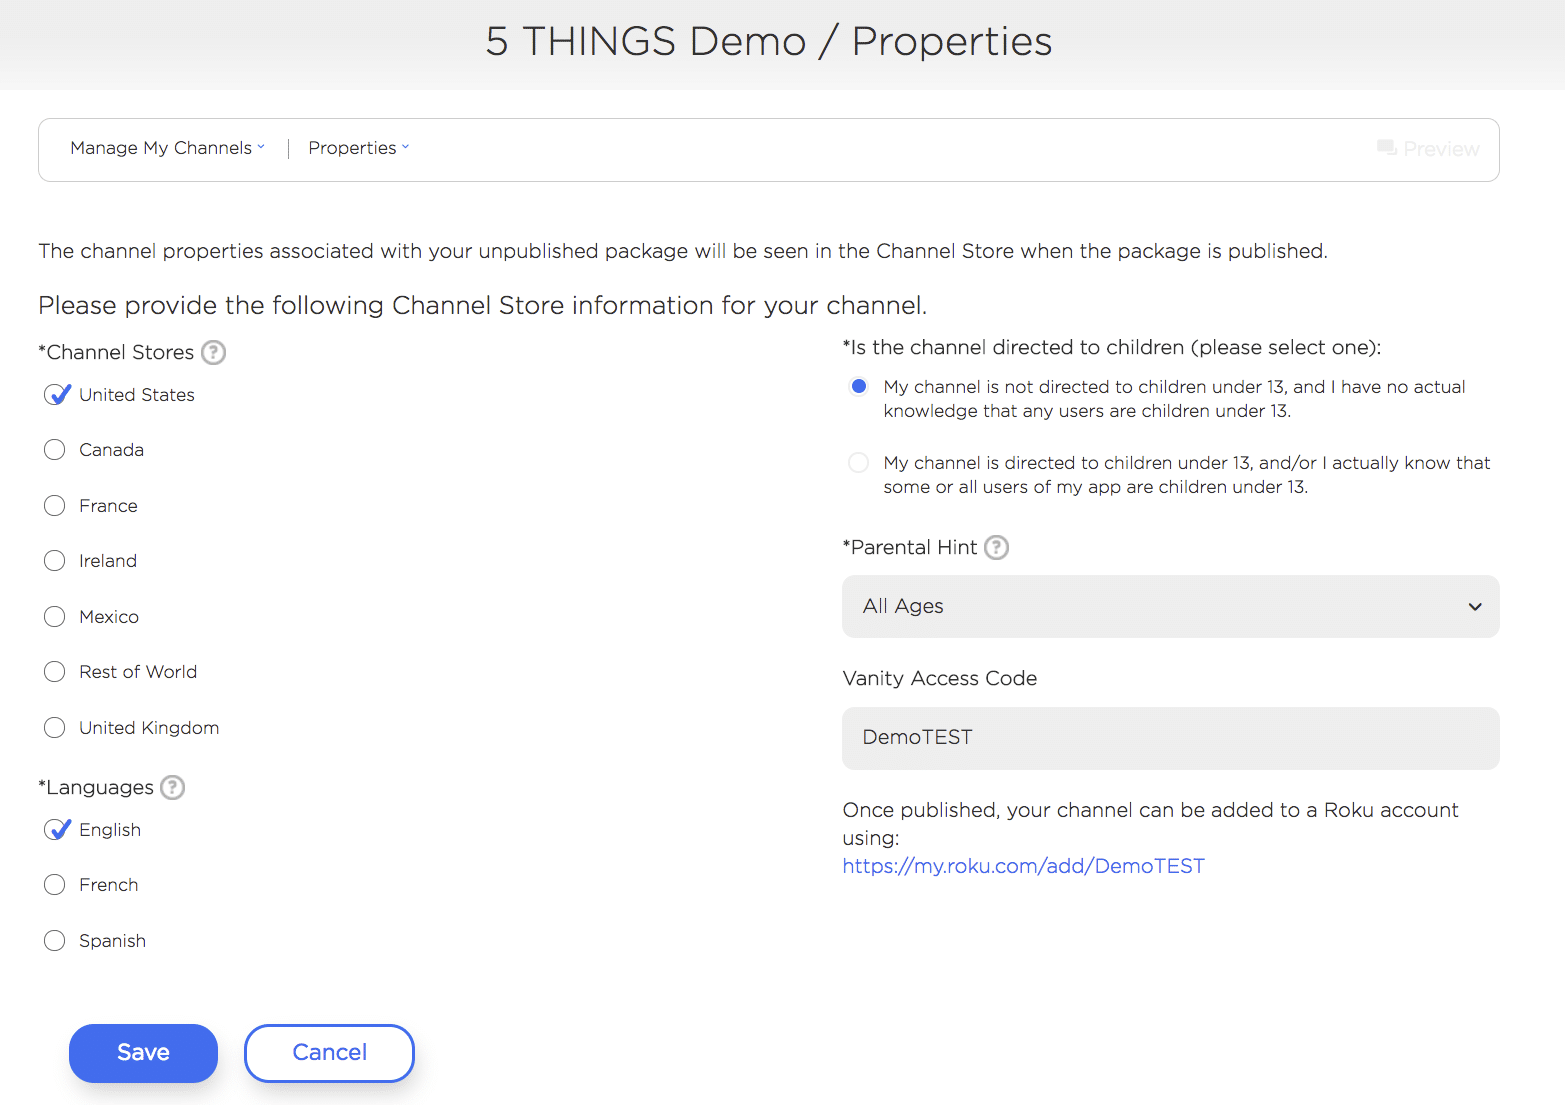
- Next, you’ll be prompted for a few various options. Where in the world your channel will be available, what language the channel is in, if your channel is intended for children or adults, and a channel vanity code. The vanity code you can pass to potential subscribers so they don’t need to search the store for your channel. Give them the vanity code, and they can enter it into their account to immediately get your channel.
- Next, you’re presented with your Feed URL. This is where you may want to pause and watch the rest of this episode because we’ll need to determine your Feed URL via other methods. Jump to “#4: How do I update my channel” for how to determine this, and them come back. Now that we’re back, I’m going to cut and paste my Feed URL, and now tell Roku what format my videos are in. I’ll explore the various media types later in this episode. However, I’m going to select “Specified in feed” so I can dynamically change the media type at any point in time.

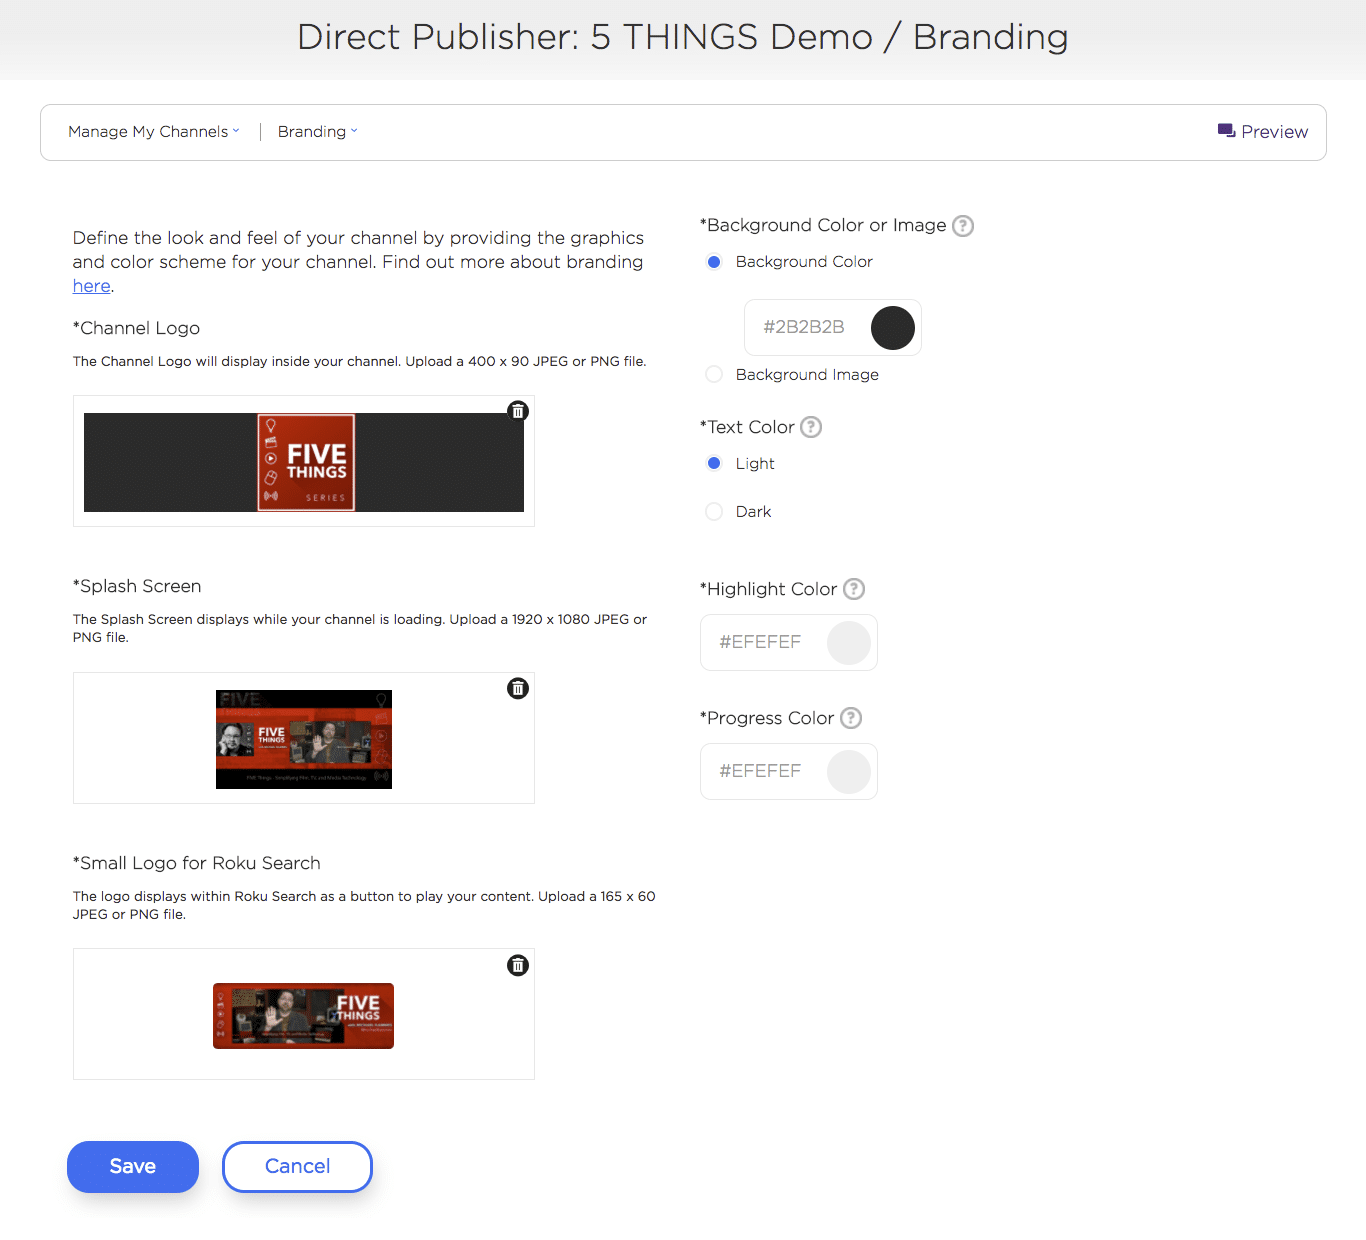
- Next, we’re at the branding page, and this is where you’ll upload custom graphics for your channel. It’s important to adhere to the graphic specs, or the page layout won’t look right. Roku will automagically make all of your graphics work on SD, HD, and UHD models of Roku, so don’t worry about creating various versions and resolutions. You also can choose your branding colors to complement your style.

- Page Layout: One thing to remember is that while Direct Publisher makes things easy to get started, it does somewhat limit the layout of your channel. That’s the tradeoff. If you want total control over your layout, then you’ll need to build your channel from the Roku SDK.

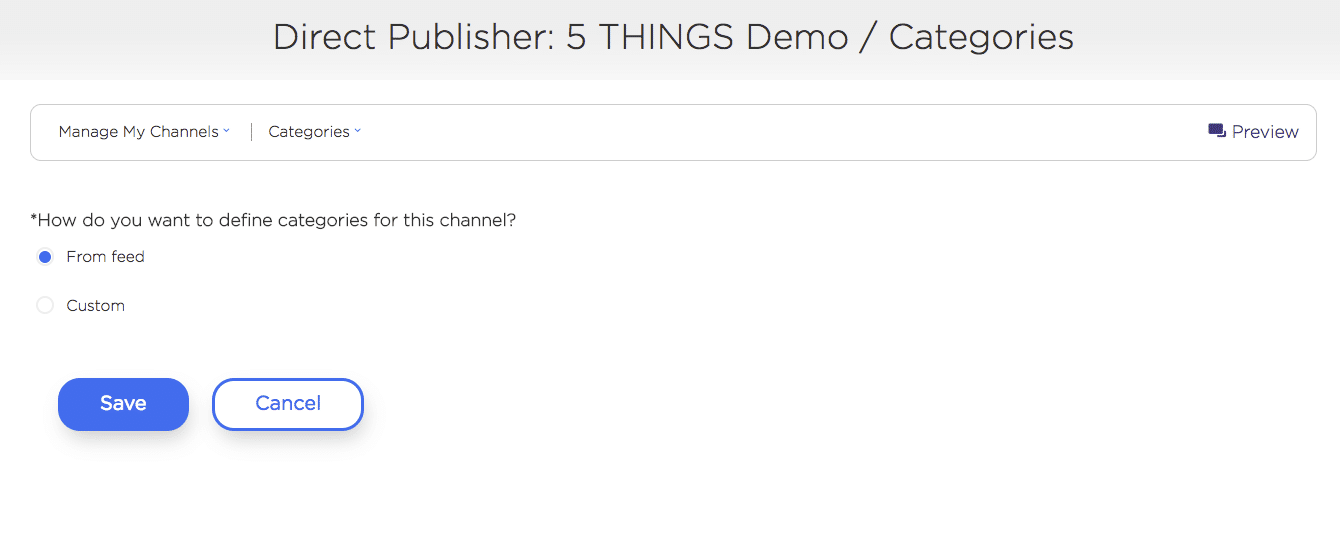
- Next, we need to define categories. Since we’re going to define the categories in our feed, we’ll select “from feed”.

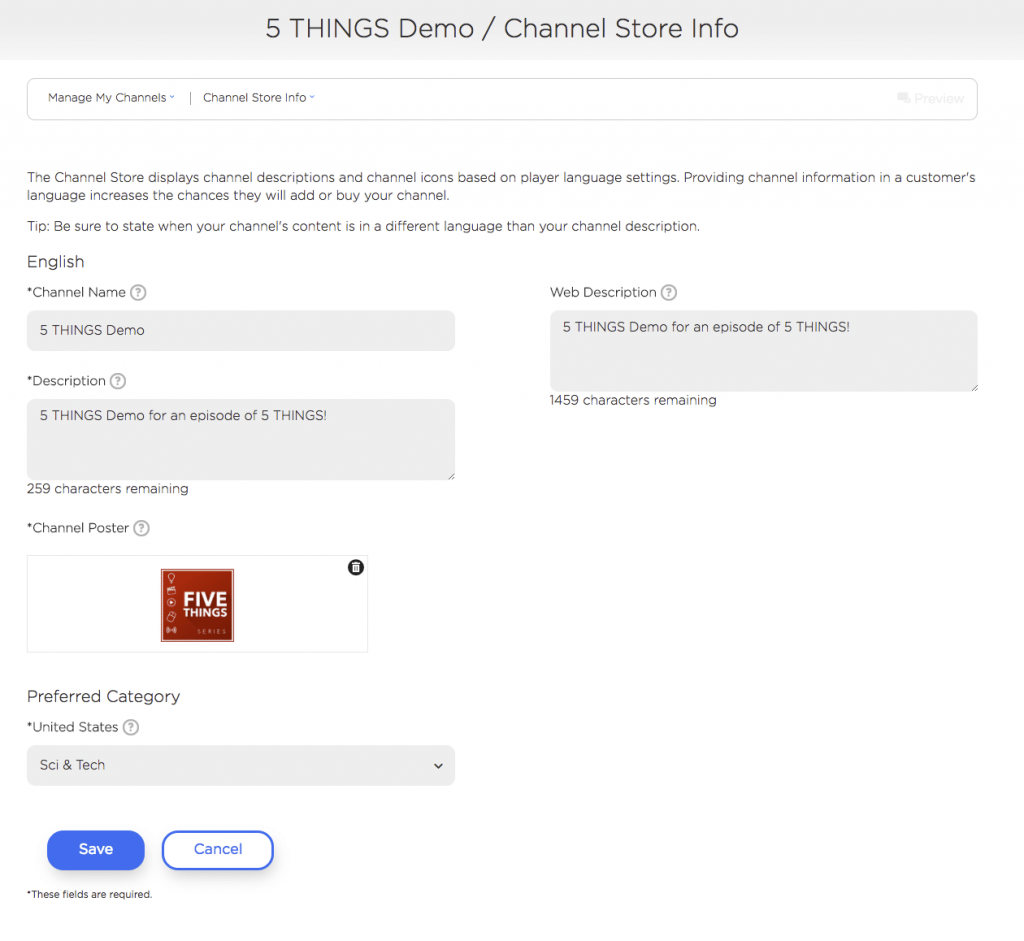
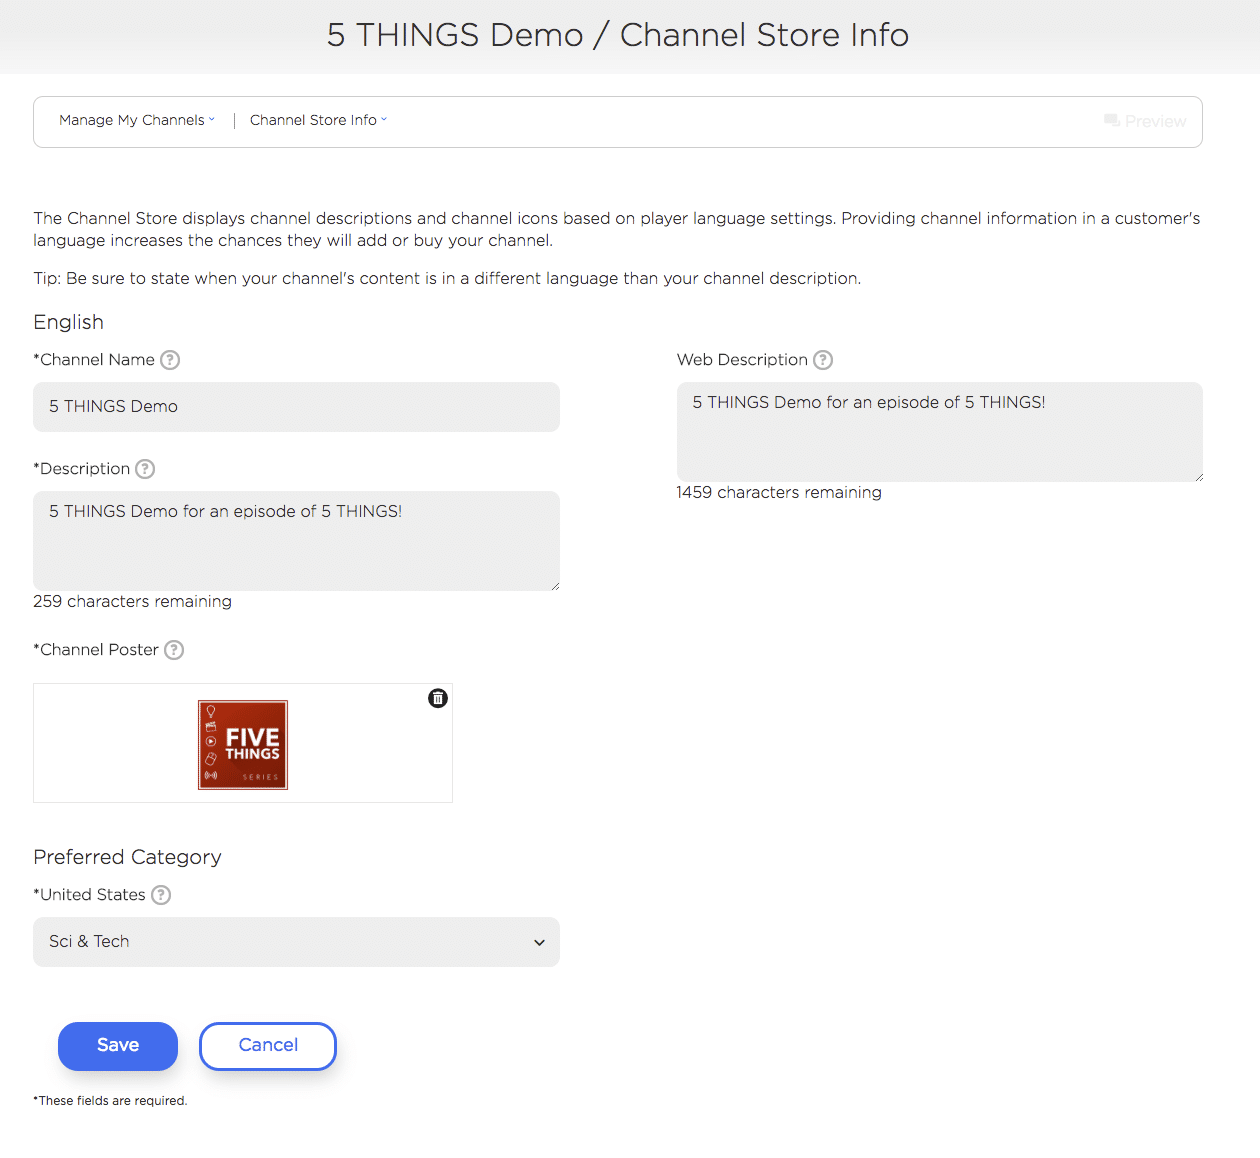
- Now, we need to enter in our all-important metadata. Channel name, It’s Description and Web Description, your channels’ category, and the uber-important keywords. Plus you’ll add a channel poster image.
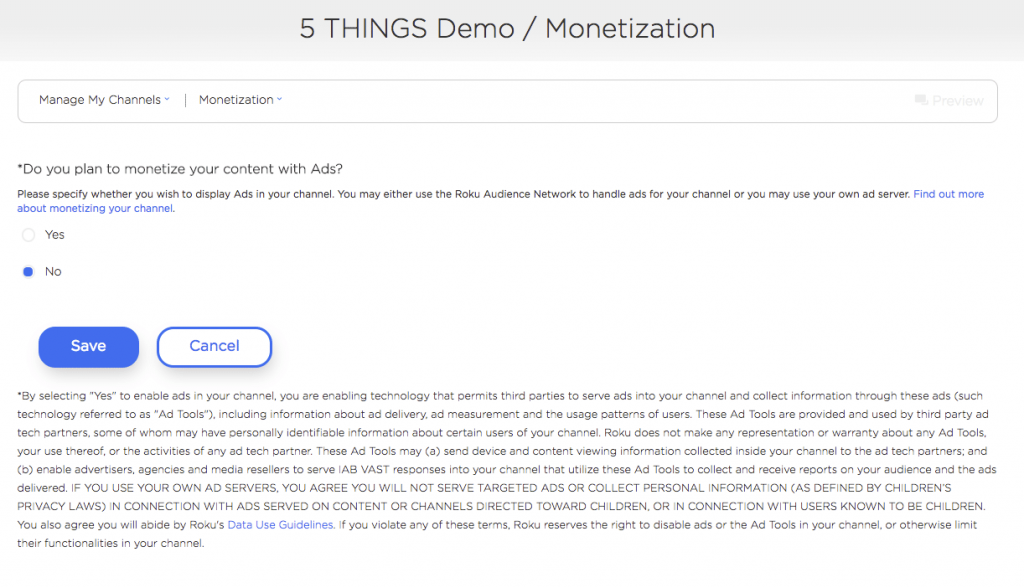
- On the next screen, are ya making money off of this thing? Most likely when you’re starting out, the answer is no, so select as such.
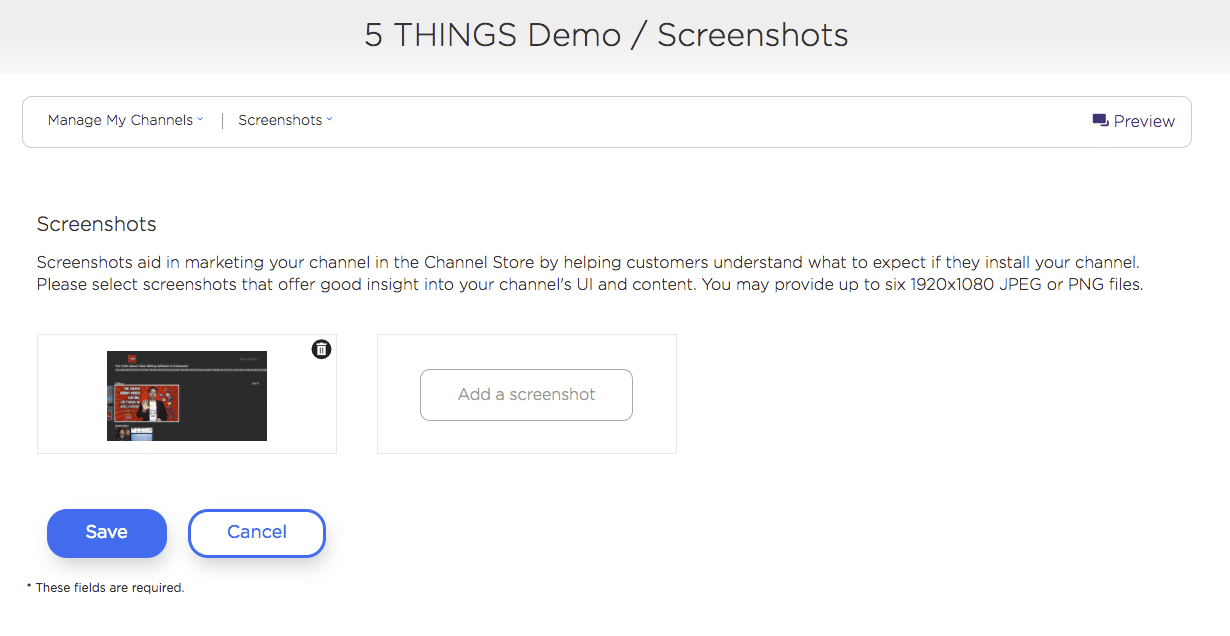
- Next, upload a screenshot. Roku can autogenerate this if your feed URL is ready, if not, upload a 1920×1080 JPG or PNG file.

- We’re now at Support Information, where you need to enter how Roku can get in touch with you, but also where do you want to drive viewers to get in contact with you or see more about your channel and your projects.
- Click Continue, and you’ll see a summary of your channel. There are icons next to each section you’ve filled out, so you can see where you may have goofed. Often you’ll see problems next to Feed Status. Not all errors are show stoppers, and many of the errors you may encounter are easily found in the Direct Publisher Roku Forum.
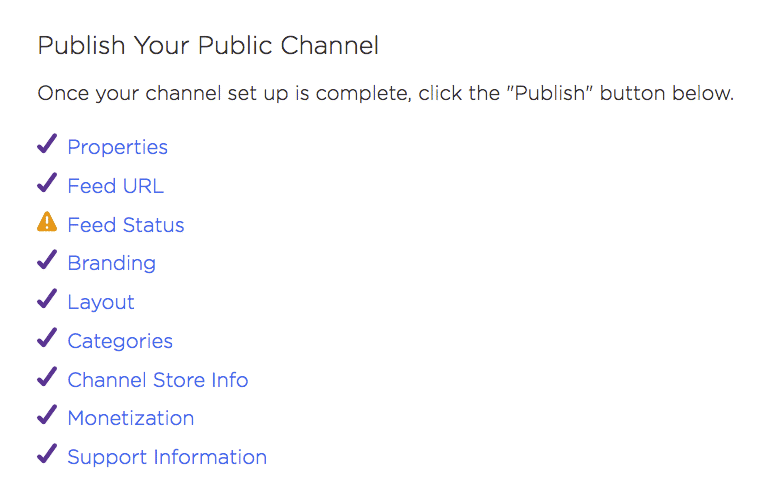
- Once things are good, click the link towards the top of the page so the channel gets published to YOUR account. This is NOT public just yet, it’s just pushed to your Roku account so you can beta test. Add the channel.
- Now, move to your Roku unit, and you’ll want to navigate to Settings – System – System Update. This will have Roku not only look for updates to your software online but also add any channels.
- Once the Roku unit is updated, you can open the channel and start testing.


BOOM, you now have the framework for your first Roku Channel. Now, we need to add some content.
3. What kind of media do I need to create for Roku?
If you’re going to promote yourself on Roku, ya need content right?
One immediate issue that many novice developers encounter is that any Roku channel you create cannot link to YouTube videos, which, of course, is a popular place to house your media. Doing so violates the YouTube terms of service, and Roku has been cracking down on channels doing these sorts of things..…plus, YouTube doesn’t offer direct links publically to their media anyway. You can, however, use a Vimeo Pro Account, as they offer up direct MP4 links to your media.
That being said, using a single, self-contained MP4, M4V or MOV for that matter, can be problematic. It’s very difficult to create a single file that works well for streaming to every device, given bandwidth and resolution.
Now, more advanced streaming formats that include segmented files at various quality levels, otherwise known as adaptive streaming, are preferred over standalone files. The end player can decide what version will play smoothly, given the available bandwidth at any point in time, so you get the highest quality file possible with no buffering errors. Microsoft Smooth Streaming, MPEG-DASH, and Apple HLS all follow this basic methodology.
Of these 3 options that Roku supports, I chose Apple HLS. Mainly due to the fact a majority of my audience uses Apple devices, and HLS is fully supported on iOS devices. You need to host this on a cloud provider or on your website. I choose to use my existing Amazon S3 bucket, but as you’ll see later, you may want to host it on your own website.
As a side note, be sure to compare the cost of CDN hosting on Amazon S3 vs how much traffic you can have on your website. Some web-hosts may bill you for traffic overages, and hosting all of your media on your website may push you over the edge. This is why I use Amazon S3.
If you hadn’t noticed, I caption all of my episodes. Roku accepts SRT caption files, as well as media with embedded captions. I use SRT as my main format and convert them into a VTT format, and I’ll explain why in a few minutes.
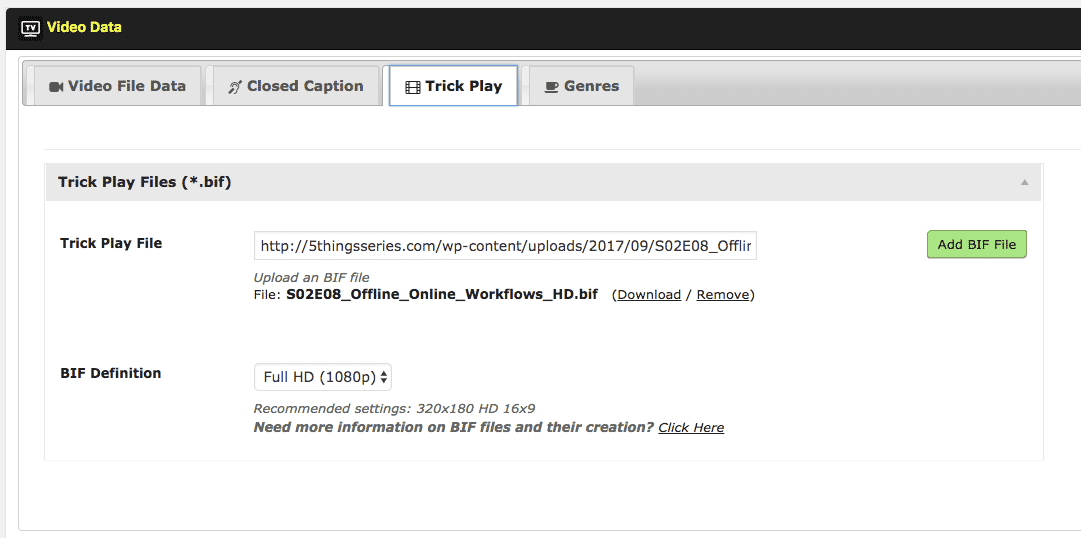
I’m also a big fan of BIF files or Base Index Frame files. These are graphic thumbnails that the user sees while rewinding and fast-forwarding through each episode. It’s a visual indicator of where the user is, not just a timestamp. I use BIF Video File Creator, now free, to create the BIF files from my final video edit. I also upload these to my Amazon S3 account.
Lastly, I create a thumbnail of my episode, much like you would do for YouTube. In fact, I now use the exact same thumbnail I create for YouTube, as Direct Publisher will automatically size it for older SD players – something that the old SDK method couldn’t do.
4. How do I update my Roku channel? (walkthrough & tutorial)
Roku’s Direct Publisher takes updates in 2 ways: via an MRSS feed, or via JSON. Now, you’re probably saying,
“Michael! You said there was no coding!”
There isn’t!
Many online apps or website templates can generate MRSS feeds of a blog post. However, JSON offers a deeper level of integration…and there are apps and website plugins that communicate to the Roku mothership via JSON.
Now, if you use WordPress as your website development environment, then you’re aware of all of the plugins to give your site more functionality. Recently, a plugin became available called WP Smart TV by Rovid-X Media. This plugin can use your WordPress site to house all of your media for your Roku channel and can push all of the updates to your Roku channel via JSON. No coding!
For me, this was an instant workflow savior. It saved me hours of time per month in coding, testing, and manually creating artwork; plus it centralized my data and media. Let me show you how it works:
- Log into your WordPress Installation, click on plug-ins, and “add new”.
- In the Keyword search box, type “WP Smart TV”. Once the plugin shows up, click “Install Now”. For this demo, I am using v1.3.1 of WP Smart TV.
- Once installed, click “Activate”.
- You may also want to install the Jetpack plugin, which is a plugin that speeds up image loading. It also can fix the error message on the Roku developer portal where Roku cannot load thumbnails. Some WordPress hosts block loading images to Roku, and this gets around it.
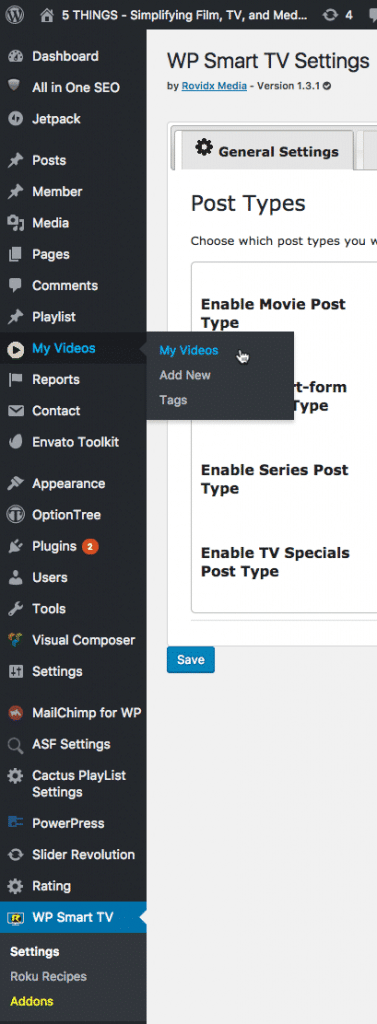
- On the left-hand side of your screen, you’ll now see a heading for “WP Smart TV”. Click it. You now will see the options for your Roku JSON feed. Under General Settings, you can select your type of posts you’re making, that best coincide with your content. Click Save.

- Under “Roku Settings”, You have options to limit the amount of posts that show up on the channel per category, as well as settings for any advertisements you may have. I highly recommend reading the documentation on Recipes, so you can have more granular control over the order in which your categories show up on the channel.
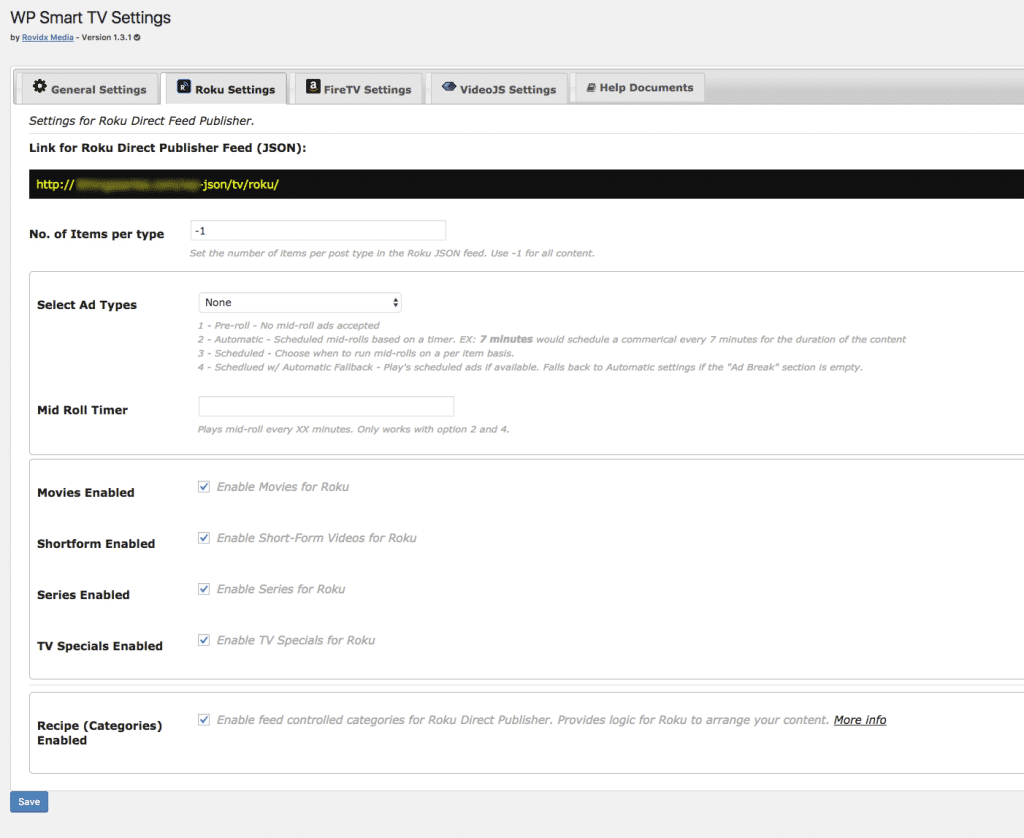
- Note the URL at the top of this section. THIS IS IMPORTANT. This is the Feed URL that you will cut and paste into the Feed URL prompt we covered in the last step. This is how WordPress, WP Smart TV, and your Roku channel talk to one another. Click Save.
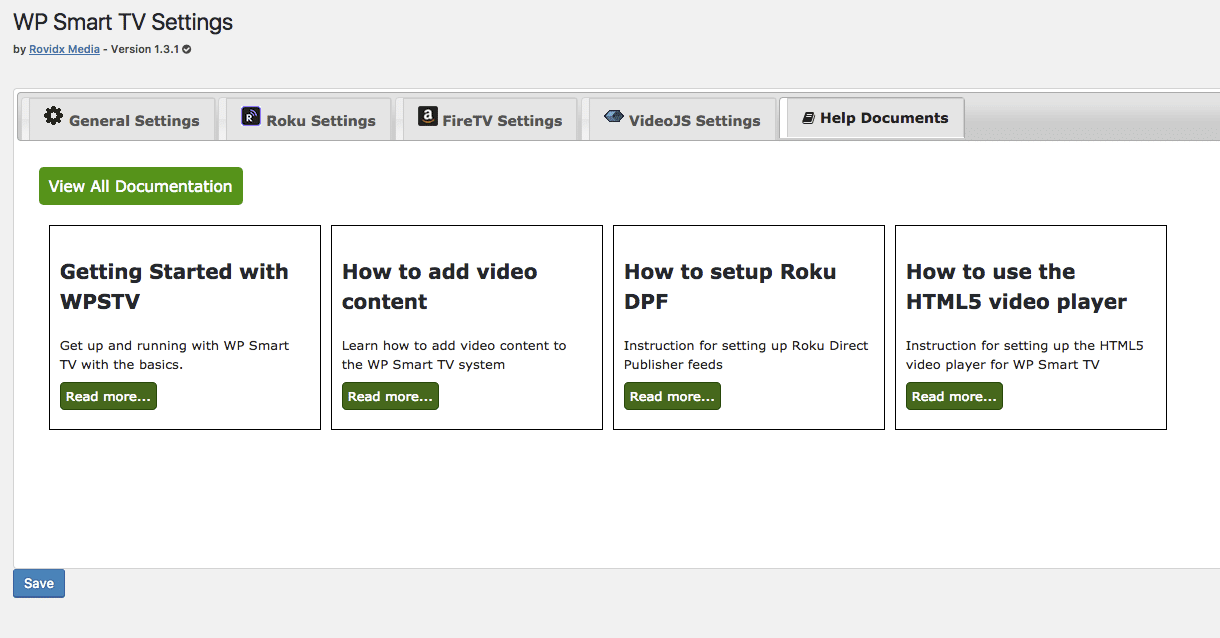
- WP Smart TV also supports other OTT devices like FireTV, for Roku we can skip over this. We can also skip over the VideoJS settings as we are not monetizing this channel in this demo.
- Lastly is the HELP documents tab, which I highly recommend reading.

- In order for WP Smart TV to add content to your feed, you’ll need to create a Video Post. On the left side of the screen is a heading called “My Videos”. Click it.
- From here, you’ll want to add a new video.
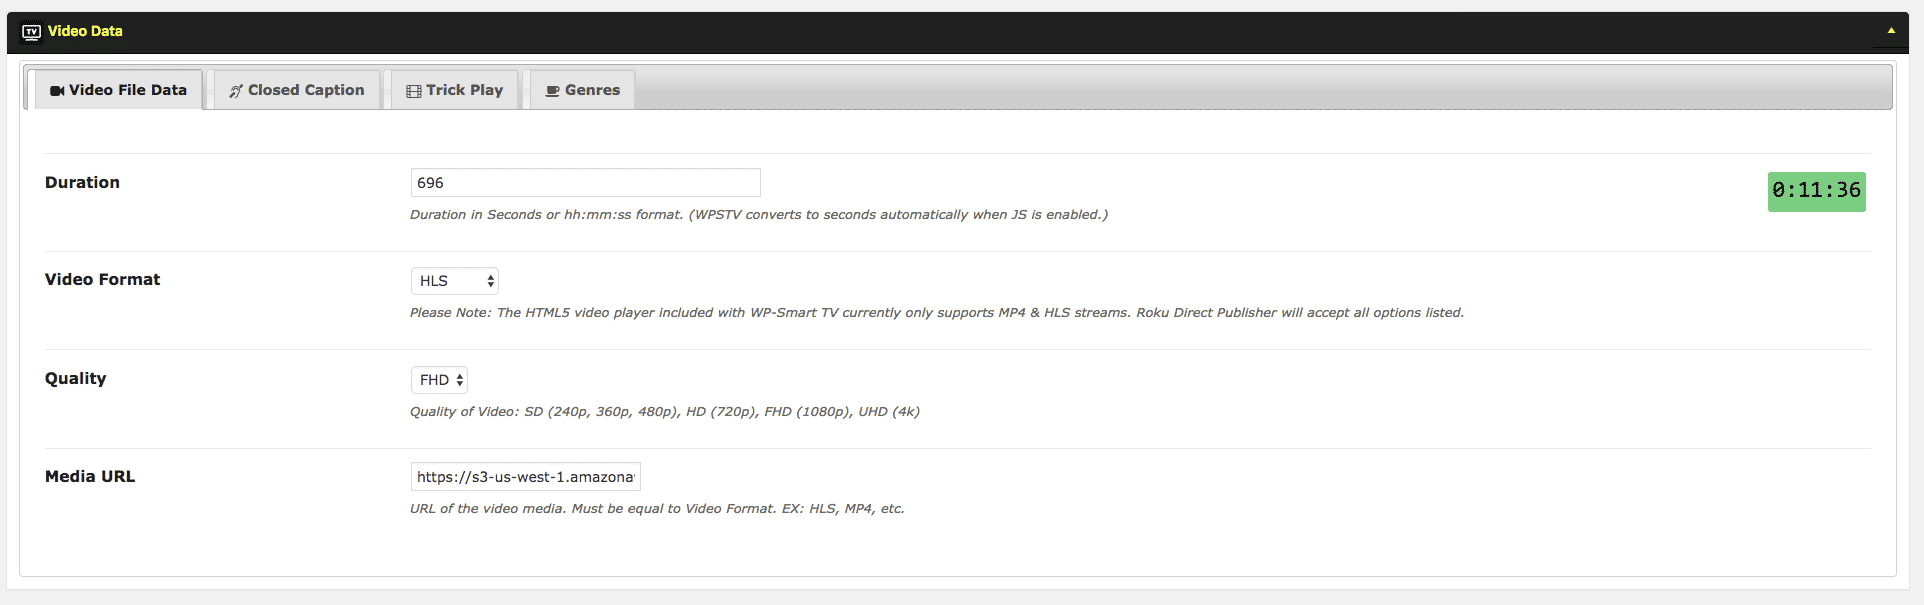
- Immediately, you’ll see the options for your Roku Media. You’ll need a new video post for every video file you want on your feed. I know, if you have a large catalog of videos, this may be tedious… but it’s much better than coding. Put in your duration, your video format, your video quality, and the location of the media. As we talked about in the “How do I create Media for Roku” section, add in the media URL here.

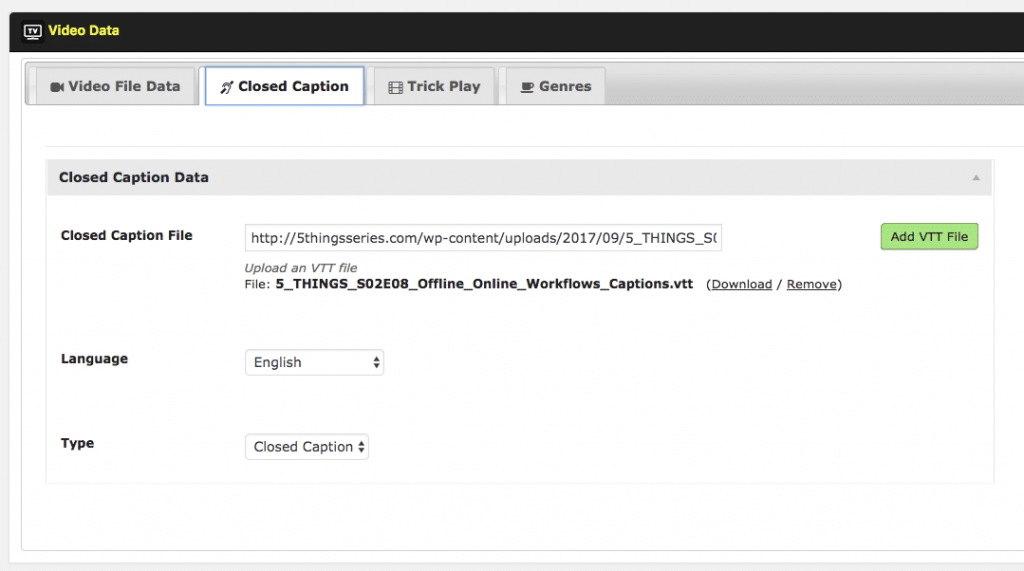
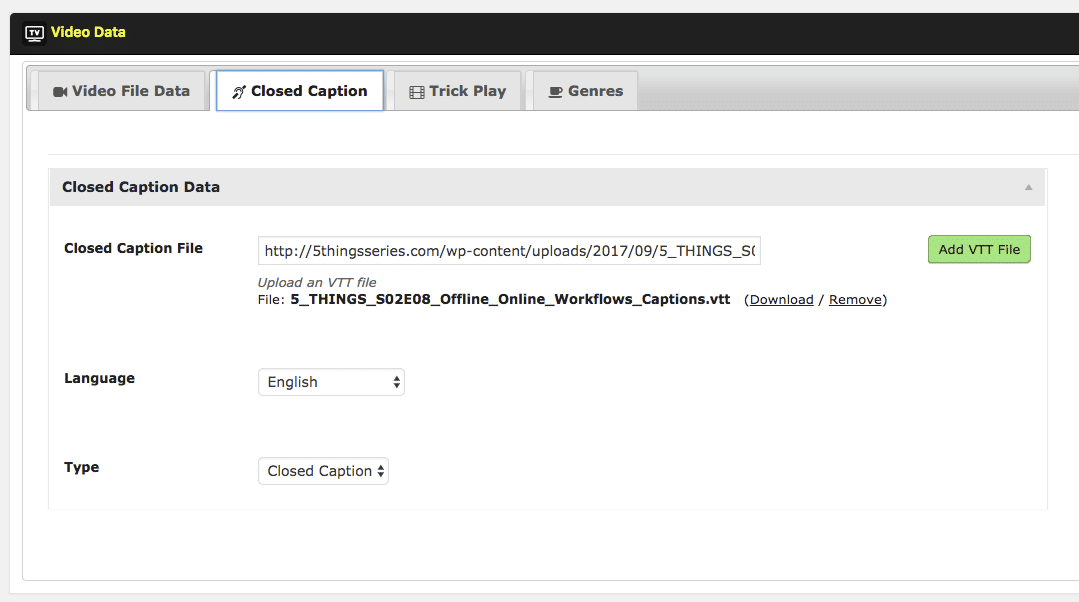
- Add Closed captions if you have them, and their language and type. Currently, VTT is accepted, so I convert my master SRT files to VTT with any number of free web-based tools. The captioning tab is optional and can be left blank.
- Trick Play is used for the BIF files, which we covered earlier.

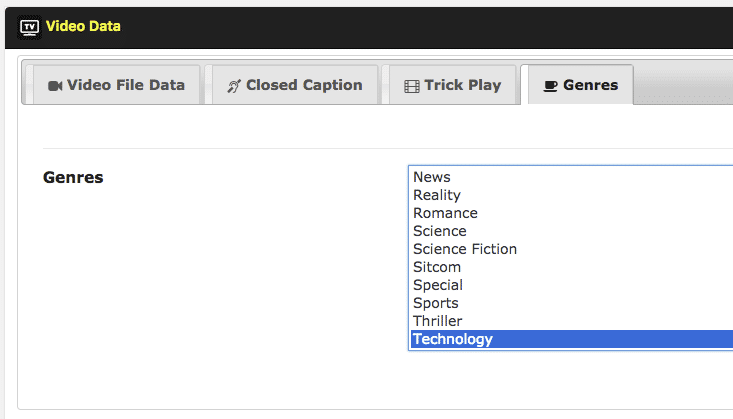
- Now, click Genres to further categorize your media, and use the custom fields for advanced control if you developed against the SDK.
- Be sure to upload a Featured Image for your post, as this is the thumbnail for the post.
- Also, enter a description at the top so viewers know what the episode is about.
- Click Publish.


Congratulations, you now have your first video for your Roku channel.
Every time you make a change to your Roku channel, you’ll need to go back to your Roku Developer page and refresh the feed. This is only temporary. Once your channel is published and is made public, the updating will occur automatically.
5. What else do I need to know?
First, ya need to buy a Roku player. You gotta know how the thing actually works, so you know how to design your channel. You also need to test your channel. As of now, there isn’t a way to 100% test your channel via SDK, via a 3rd party website, or by Direct Publisher without one. So check out the current models, and see which one works for you.

Also, this ain’t “Field of Dreams”.
Just because you build it, doesn’t mean people will flock to it. So, you need to promote it. This includes Roku themed channel sites, as well as on Roku user forums, plus on your other sites, like YouTube, Vimeo, and other social media channels.
Now, as mentioned earlier, Direct Publisher does have a framework for ads and thus ad revenue, so you can conceivably make money off of your channel. But if you’re not making much on YouTube, do you really expect to make more on Roku? Roku is big, but not YouTube big.
To be clear, I don’t recommend it as your sole point of distribution. But in the huge marketplace reality where there is competition for eyeballs everywhere, branching out into a realm that has less than, let’s say, YouTube, means you have another audience to engage with. And 40 million eyeballs per month ain’t bad.
Until the next episode: learn more, do more.
Like early, share often, and don’t forget to subscribe. Thanks for watching.
You can also use my free wordpress plugin.. https://github.com/upggr/ielko-video-client
Thanks for the reply.
Do you have screenshots or workflow docs or anything to show usage?
Straight forward, just added a few screenshots 🙂
Thank, very useful. what if I don’t have a website! How can I get a MRSS feed?
Unfortunately, you need somewhere online to put all of your content so the Roku channel can read it. You could put your content on Amazon, Azure, etc….but the framework to create an MRSS feed would be a bit more difficult. Really, running it on a webhost with a CDN like WordPress is really the easiest way to go.
Thanks.
Here’s a link to a rss feed I found in one of Roku SDK toturials (http://api.delvenetworks.com/rest/organizations/59021fabe3b645968e382ac726cd6c7b/channels/1cfd09ab38e54f48be8498e0249f5c83/media.rss). Assuming the formatting is the same, what upload center you would recommand that I can use to upload my modified version of rss file and use it for Roku direct publisher wizard?
Hello:
Here are the specs for the MRSS feed: https://github.com/rokudev/feed-specifications/blob/master/mrss-feed-specification.md
As the file is very small, just about anywhere that allows for public read access is good. I use Amazon S3, for example.
This blog was very informative and I can add my channel on Roku by myself and also I referred to this website https://www.rokuactivationcode.com/roku-channel-activation/ and helped me to sort out my issues regarding adding channels on Roku
I approved this spam comment for 1 reason: If any one else comes across this URL, it’s a scam. Report it.
More info: https://support.roku.com/article/208757068-will-i-be-charged-for-customer-service-or-device-activation-
Cam you use VIMEO prop to host your vids?
Yes! You do need a Pro account, however, so you can get the direct MP4 links to the videos.
Thanks for watching.
You can use the MRSS Feed Updater and the JSON Feed Manager software that I wrote. Both run on Windows pcs.
Thanks for the info, and thanks for the info on the Roku DP forum!
I receive the error The server returned an unsupported content type. Was expecting ‘application/rss+xml’, ‘text/xml’, ‘application/xml’ or ‘application/json’ but received ‘text/html’ after inputting my JSON feed URL.
Where is this error occurring? On the Roku Dev site? It sounds like you are inputting a webpage URL (.htm, .html, .php, etc) instead of a JSON feed (usually a directory).
Yes on the Roku DP site. I am entering the URL given to me. Link for Roku Direct Publisher Feed (JSON):
http://primoarcade.byethost9.com/wp-json/tv/roku/
Can you set up a subscription channel with this method?
Good question. As of now, I don’t believe that is possible. Via SDK, yes, but not via Direct Publisher.
Thanks for watching!
i’ve noticed the release date given to any of my movie files is the date i post – not the year the film was made – how do you make a custom field to allow changing the displayed release date on the Roku?
In afraid that would be a question for the plugin developer, https://rovidx.com/ .
Thanks for watching!
Hi the wp smart tv WordPress plugin can do the job or replace the job of Vimeo or Vimeo Pro?
You still need a place to host the video. WP Smart TV does not host the video.
Thanks for watching / reading!
Can you password protect your channel? I don’t want to charge a fee. I do want only a specific audience to see my content.
Good Question. I do not believe Roku allows for password protected channels. Roku does have unlisted (AKA private, hidden, or “non-certified”) channels, which folks will need a code to find and access. But it’s one code for everyone.
Thanks for watching!
Michael,; Is that the same as the vanity code?
Yes.
However, you can use a vanity code to add published (listed) AND unpublished (unlisted, private) channels.
Next question. My company prefers to store Cloud based Content on Microsoft One Drive. Dropbox is second. We have a Vimeo account. It is the step down from Pro because it can be password protected. Can OneDrive or Dropbox be used with Roku and WordPress?
As long as you are presenting a valid media URL (*.mp4, *.m3u8, etc.), and the cloud storage has open permissions to the outside world, you should be OK. That being said, Dropbox is NOT designed as a CDN, so I suspect your performance may suffer slightly. I recommend sticking with CDNs that are media centric.
Feel free to contact me directly and perhaps I can do some consulting for you.
Thanks for watching/reading!
Hi there, I can’t thank you enough for making this so straight forward and easy for us! I have one question regarding the JSON feed URL that WP Smart TV generates; How might I resolve this URL/Feed (https://wofmi.org/wp-json/tv/roku/) issue that doesn’t seem to work with a message that says: “The server returned an unsupported content type. Was expecting ‘application/rss+xml’, ‘text/xml’, ‘application/xml’ or ‘application/json’ but received ‘text/html; charset=UTF-8’.” ?
Sorry for the delay – holiday vacation!
What is giving you this error? The Roku website/validator?
Have you reached out to the folks at WP Smart TV?
Does the WP Smart TV plugin still work? I followed all your steps and am having issues with the feed. I contacted plugin support with no response and Roku Direct Publisher supports says there are many issues with the feed file. Thanks!
Indeed it does. I see Rob has been responding to posts today.
Rob is right. His software is working, and feeds are working, but Direct Publisher has many issues. Often you just have to….wait.
Good Luck!
Yes I was able to get a hold of Rob. I keep making adjustments as suggested by support and the feed still doesn’t work. I tried to follow your instructions but somehow I keep making mistakes. Now the Roku feed validator says I have “no assets downloaded”. I am not sure what that means. My videos are hosted on AWS and the url works in the WP Smart plugin. Any help you could offer would be greatly appreciated!