Have you ever thought about using a Hackintosh? Wondering how they perform? Or maybe you wanna build one? Fear not my tech friends, for in this episode, we’ve got you covered.
1. Why Build a Hackintosh?
If you spend any amount of time following Apple, you’ve realized that they are a consumer technology juggernaut. Phones, tablets, watches, headphones. This has led some to speculate that Apple isn’t paying attention to the professional market.
That is, Apple isn’t making computers for those who need a lot of horsepower for creative applications, and expandability to make the system more powerful than what the factory model ships with…or what Apple deems us as worthy of.
We also need to look at the cost. The Apple logo carries a price premium, and without much exception, Apple computers are more expensive than their Windows or Linux counterparts. And while I concede that a ready-to-roll machine should cost more than the sum of its parts, Apple tends to inflate this more than most.
Another reason to build a Hackintosh….is, well, because it’s there. Because you can. Well, physically, anyway. I’m not a lawyer, and debating the legalities of building a Hackintosh is not my idea of an afternoon well spent. However, the tech challenge in and of itself is enough for some to dig in.
Lastly, owning a Hackintosh means you’ll at some point you’re gonna need troubleshoot the build due to a software update breaking things. If you don’t build it yourself, you’re not gonna know where the bodies are buried, and you’ll be relying on someone else to fix it.
For all of these reasons, I rolled up my sleeves, grabbed some thermal paste, and went down the road of building my very own Hackintosh.
2. Choosing the Right Parts
“Look before you leap.”
When building my Hackintosh, this was my cardinal rule. See what others had done before, what hardware and software junkies had deemed as humanly possible, and follow build guides. Although I was willing to build it, I didn’t want it to be a constant source of annoyance due to glitches, and then no avenue to search for answers if things went south. Part of building a Hackintosh is being prepared for things to break with software updates – and to only update after others had found the bugs. I wanted to keep the tinkering after the build to a minimum.
More createy, less fixey.
The main site online for a build like this is tonyxmac86.com. The site has tons of example builds, a large community on their forums, and even better, users who have done this a lot longer than me.
A great starting point is the “Buyer’s Guide” which has parts and pieces that lend themselves to the power than many Apple machines have. A CustoMac Mini, for example, is closely related to the horsepower and form factor you’d find with a Mac Mini.
As I tend to ride computers out for awhile, I decided to build a machine with some longevity.
Longevity meant building a more powerful machine, and thus as close as possible to a Mac Pro. And wouldn’t you know it, there is a section called “CustoMac Pro”.
 The downside to a machine as powerful and expandable as a CustoMac Pro is that it’s fairly large. After I took inventory of all of the expansion cards I’d want to use, I realized I didn’t need everything that a CustoMac Pro afforded me. The large motherboard in the system – known as an ATX board, was simply overkill and was too large of a footprint for my work area. I could actually go with something a little bit smaller and still have plenty of horsepower.
So, I looked into the CustoMac mATX builds. M stands for Micro, and the mATX board would be similar to a full sized ATX board, but a bit smaller. I’d also lose some expandability with a smaller, micro ATX motherboard, but I could use the same processor that I would use in a full size build – in this case, a Core i7-8700K, and still get a decent amount of RAM (64GB) and have a couple of PCIe slots for a Graphics card and future a 10GigE card.
I then went through the process of combing through the forums to see if there were any guides or posts pertaining to the parts outlined in the CustoMac mATX section. And wouldn’t you know it, there was an extremely in-depth post that outlined each step in detail. (Seriously, follow this guide if you get the gear below, it outlines things I have not for sake of brevity.)
Next, I cross-referenced the parts listed with reviews online, and I also consulted various communities and folks off of the tonymacx86 site to get some independent opinions. This caused me to change a few things up, like getting quieter fans, a more stylish case, and a few minor tweaks.
At this point, I was fairly convinced the parts and accompanying guides and forum posts were going to be enough to point the way, so I pulled the trigger and bought the parts.
As the build was going to be massively based on the work that others had done before me on tonymacx86.com, I purchased the parts via the site’s referral codes. Sure, I paid a little bit more, but let’s support the community, eh?
Total: $2269.42 USD (not including tax and shipping)
Now that the parts were ordered, it was time to prep the macOS installer.
3. Building the Hackintosh
A computer won’t do much for most of us unless it has an OS. In order to get the macOS onto a non-Apple machine, we need to prep the OS appropriately.
Unibeast with High Sierra
Step 1 is to download Sierra or High Sierra from the Apple app store on another Apple computer.
Step 2 requires us to download a Mac app called Unibeast. Unibeast will take the macOS installer, and place it on a bootable USB stick along with an app called Clover, which contains the files needed to allow the OS to install on non-Apple hardware.
For Step 3, we need to format a USB stick for the OS to be on. Make sure it’s formatted as macOS Extended (Journaled), and make sure the partition size is relatively small. Unibeast recommends a 7GB partition. Larger sizes, like newer 128GB, 256GB or even larger sticks, just won’t fly – partition them into a smaller size. I also recommend a USB 3.0 stick, it’ll make things go a little bit quicker.
Launch Unibeast for Step 4 and follow the prompts to select the USB stick, as well as various options for install – such as the Clover EFI Boot type and inserting legacy graphics drivers into the install if necessary. Then, let Unibeast create your installer on your USB stick.
A note about the EFI Bootloader config: When your Hackintosh boots, it looks for an EFI partition. The EFI partition contains basic system drivers and options. If your EFI folder is borked, well, so will your build. This is where Unibeast, Clover, and your hardware need to be in sync. As you’ll see later on in the video, my EFI folder during the USB stick build was no bueno, and caused a bunch of issues.
Now that we have our macOS installer prepped, let’s get to the hardware build.
At this point, I *highly* recommend you watch the video and/or read the guide I followed.
Build notes:
- Install power supply first so as to thread cables appropriate through the case.
- Have needle nose pliers for the Noctua fan installation.
- Did your motherboard come with screws? Probably not. Then they should be in your case. Better check.
- Ensure any backplates for the processor are installed before you put the motherboard in the case. Don’t forget your heatsink spacers, too.
I then went into the system BIOS as outlined by the guide, and replicated the BIOS changes. Then, reboot!
4. Installing the macOS
As you have the USB installer from the last step, boot the Hackintosh from it and install as normal. Below are the issues I ran into.
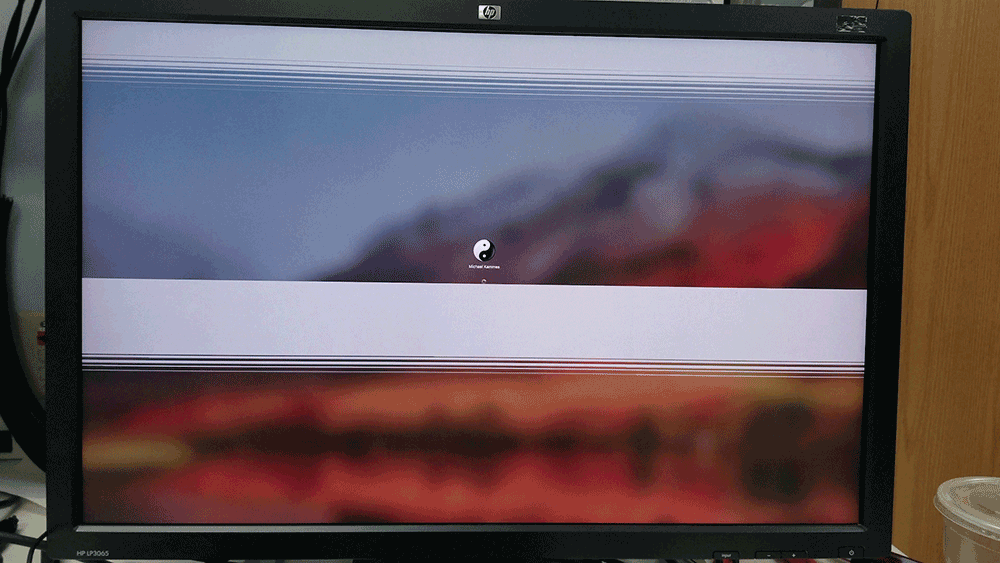
After the OS was installed, the system booted very slowly (over 60 seconds) and upon logging in, the GUI refreshes looked odd. I also found the system didn’t recognize the NIC. As the EFI partition usually loads these drivers, I decided to swap out the drivers located on the Boot “drive” for the drivers on the EFI partition on the USB stick. As the EFI partitions are normally hidden, I used an app called EFI Mounter 3. This allowed me to mount the hidden EFI partitions on each volume, and subsequently copy the EFI folder from the USB stick to the boot “drive”.
This seemed to do the trick, as the correct nVidia (web) drivers were loading, and screen refreshes looked correct. The system also booted faster. I’m not sure what happened – it may have been a Unibeast and Clover version mismatch, or just a bad USB stick creation. For whatever reason, the system was now functioning correctly.
I proceeded to then perform post-installation tweaks in the guide, including editing the config.plist so the RAM was seen properly, as well as changing the label of the Mac (for cosmetic reasons).
5. Performance and Conclusions
First, we have black and white analytics. Raw horsepower. A common tool is Geekbench. Download the Geekbench app, let it run and whammo, you get performance metrics.
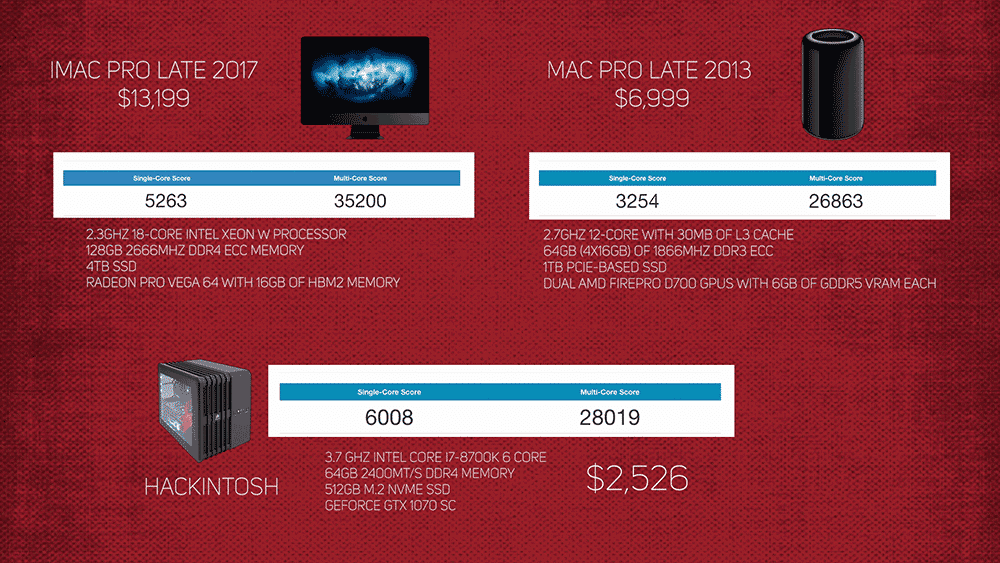
I decided to compare my build against a top of the line Late 2017 iMac Pro, retailing for $13,199 (thanks Lumaforge!) as well as against a Late 2013 Mac Pro canister, with a retail cost of about $7,000 today. My build came in at just over $2500.
Here are the results of the Geekbench testing. You can see that my build beats the Mac Pro hands down, but is handily beat by the multicore performance of an iMac Pro, albeit at a price tag that’s 5x as expensive.
As each of these computers were built with much different parts, a straight horsepower comparison isn’t enough. So, I also benchmarked all 3 systems with Adobe Creative Cloud (Premiere Pro and Media Encoder), Apple (FCP X), and Avid (Media Composer Ultimate) software.
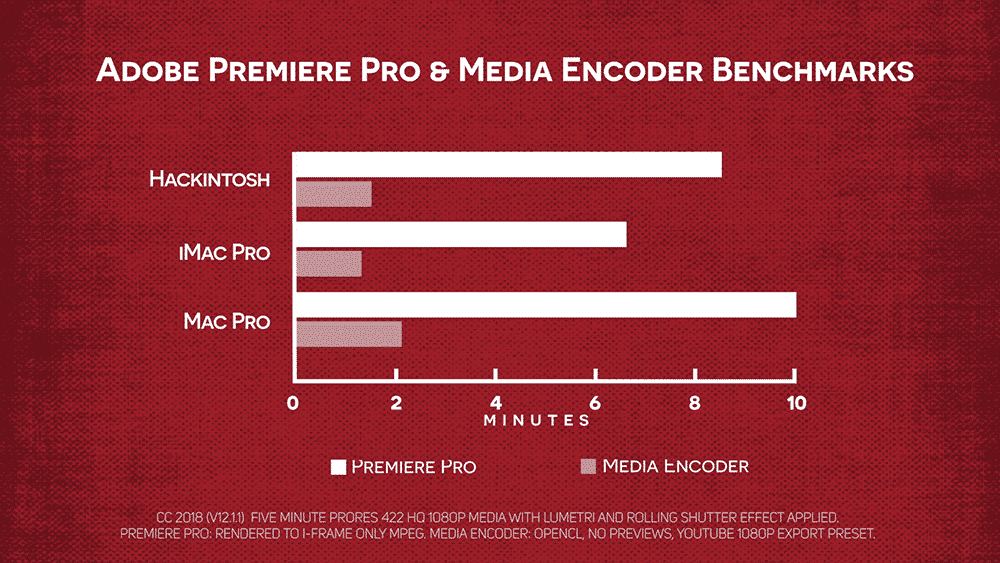
First, I did timeline render tests with Adobe Premiere Pro 2018. I also used Adobe Media Encoder and exported to an h.264. The results are pretty much in line with the Geekbench results. The iMac Pro was the fastest performer, followed by the Hackintosh, and then the aging Mac Pro. Remember, the shorter the time, the better (faster).
| Premiere Pro Render | Media Encoder Export | |
| Hackintosh | 8:36 | 1:27 |
| Late 2017 iMac Pro | 6:37 | 1:20 |
| Late 2013 Mac Pro | 10:25 | 2:04 |
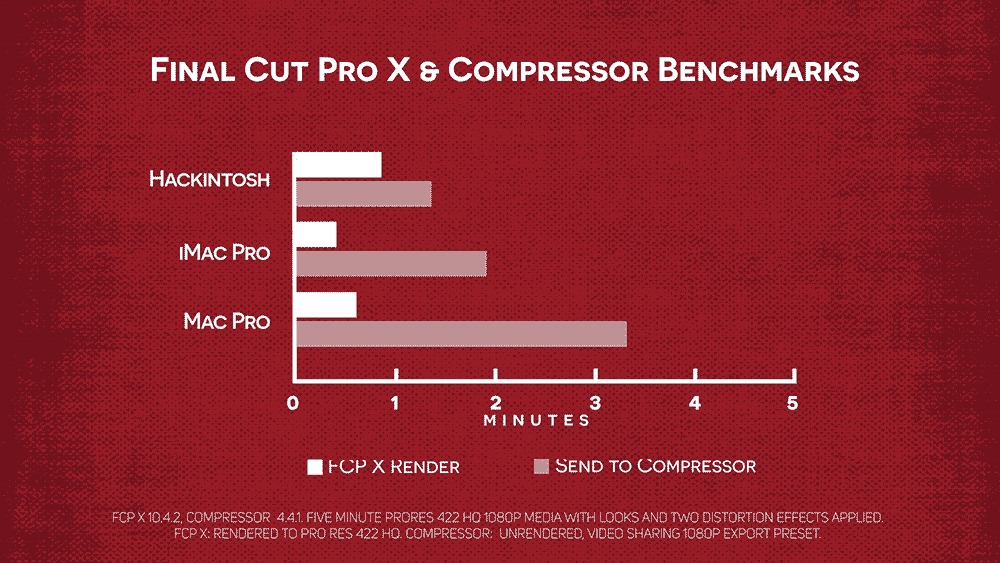
Now on to FCP X, v10.4.2, where I expected my system to fall down due to the graphics card being nVidia as opposed to the AMD cards found inside other Apple computers. I did a timeline render benchmark, plus a Compressor encode time trial. For renders, all 3 systems were very, very fast, in fact, FCP X rendered faster than any of the other NLEs. My Hackintosh did indeed end up rendering the slowest – however all systems rendered within a few seconds of one another.
| FCP X Render | Send To Compressor Export | |
| Hackintosh | :48 | 1:22 |
| Late 2017 iMac Pro | :25 | 1:53 |
| Late 2013 Mac Pro | :35 | 3:19 |
That being said, my build exported the fastest, barely beating out the iMac Pro.
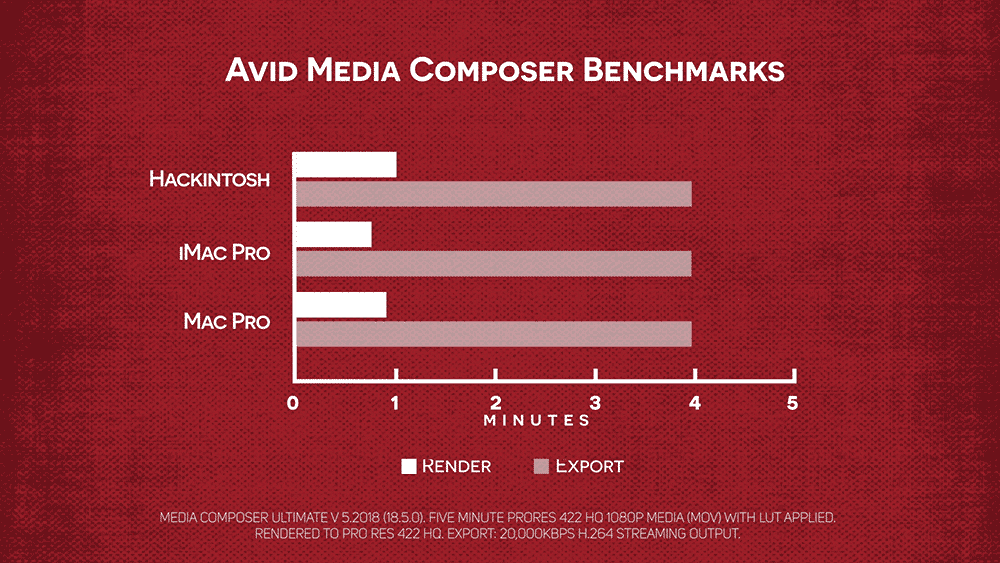
Lastly, Avid Media Composer, where I tested with the 2018.5 Ultimate version. The iMac Pro came in first again, with the MacPro actually slightly beating my Hackintosh…however, all 3 systems were within seconds of one another. Export times are largely irrelevant out of Media Composer – each system exported at exactly the same time – given Media Composer’s reliance on 32 bit Quicktime 7 for exports.
| Media Composer Render | Media Composer Export | |
| Hackintosh | 1:59 | 3:56×2 (2-pass) |
| Late 2017 iMac Pro | :46 | 3:56×2 (2-pass) |
| Late 2013 Mac Pro | :56 | 3:56×2 (2-pass) |
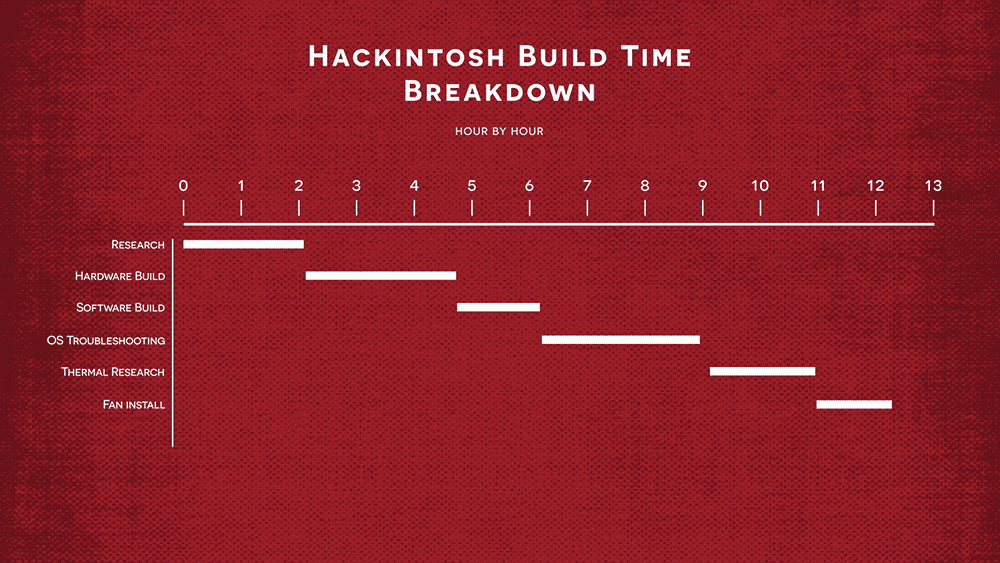
So, “how long did it take you to build it?”
The initial build took 9 hours. This includes research, the hardware build, the software build and initial software troubleshooting. However, in the month since I’ve built the machine, I’ve had to spend an additional 3 hours troubleshooting thermal issues, and buying 2 additional fans and installing them, bringing my total to a little over 12 hours.
Do I have any regerts? A few.
 The motherboard I chose didn’t have Thunderbolt on board. Not that I have any Thunderbolt devices, but it would have been nice to have an option for the future. I also haven’t seen much performance gains between OpenCL and CUDA playback inside Adobe apps. I purposely went with a GeForce GTX 1070 SC as I expected performance gains with CUDA enabled. As other apps – namely Final Cut X, are optimized for AMD cards, I would have rather gone with a Vega card, use OpenCL inside Adobe, and still maximize the performance from other AMD enhanced apps.
So, “was it worth it?”
As a full-time tech nerd and part-time creative – yes. First time I’ve built a computer from scratch in over a decade, and I learned more about the underpinnings of the Mac OS than I otherwise would have.
But does this cost savings outweigh the peace of mind of a fully supported, warrantied and sexy looking piece of Apple gear? For someone who is a full-time creative professional- I’m gonna say no. You need a system that works, one that you can apply updates when needed, and easily add additional hardware and software. Time is money, and the less time you can spend troubleshooting the better.
Until the next episode: learn more, do more.
Like early, share often, and don’t forget to subscribe. Thanks for watching.



You naughty naughty boy
“I sure could use a donut” – nice “APB” arcade game sound up. Also appreciate the Spaceballs luggage quote. Very funny Michael. It’s been about 10 years for me too since I built a system, I may go to the dark side and attempt. Thanks again for a great 5 things.
Thanks Michael. Great video. I’d be really curious how that config performs on Resolve compared to a the other two. From a performance standpoint, isn’t Resolve weighted towards Cuda? Would the system support multiple graphics cards?
Hi Don:
Resolve is VERY GPU dependent, so I thought including it in the episode wasn’t applicable, although tempting. My system could potentially have a 2nd GPU, although my slot speeds would go down to x8 speed. Single GPU and only using 1 slot on my motherboard is x16 speed. I have not done benchmarks on x8 vs x16 performance speeds with my GPU.
Your video was scarily almost precisely my recent attempt. What kind of thermal issue and how did it effect your performance/stability? I would have expected that noctua cooler to be very effective. My build does have Thunderbolt on-board, but there doesn’t seem to be drivers avail for that yet (hoping in the future). Thank you, your observations were wonderfully entertaining.
The system was running around 95 degrees (F) under no load (I know, I’m supposed to use Celcius, mea culpa) but when I stress tested it, I’d get right over 200 degrees, and the sucker would hard crash. 200 degrees is way outta spec. Fix: I ordered a 2nd rear fan, and rotated the heatsink 90 degrees, so the heatsink fan exhausted to the rear instead of up. My original thought was to intake from the front, air moves over the processor, and the fan in the heatsink exhausts up to the largest fan in the case, and the system… Read more »
Great video, Michael! I agree with you, I would not be comfortable using the machine as a production workhorse, but it’s a nice side project. I abandoned Macs in 2012 for Dell and HP mobile workstations and can’t imagine going back.
I don’t personally use FCP X and Resolve, Media Composer and Adobe work on Windows 10 systems, which is, nowadays, a very usable OS and I can’t imagine not being able to use Digital Vision Nucoda. My ProRes needs are fully covered and fully Apple approved.
Another great episode! Good timing for me as I was just considering doing a monster PC vs a Hackintosh. I’ve decided (especially for my workflow) to go the PC route. When I have it built I’ll send over the bench marks. Keep up the good work!
Have you tried the same tests on a windows, same hardware?
No, I have not. Mainly because I used Pro Res media for the Apple tests, and I can’t recreate that on the Windows side without throwing odd software into the mix. I’d also need to buy another M.2 NVME SSD which are not cheap!
Thanks for watching.
It’d have more utility and be worth it if set up with two boot drives selectable at startup via F12 to go into either mac OS or Windows 10 for gaming / virtual reality.
Do you know which warrantied PC would be comparable to the Late 2017 iMac Pro you tested? Peace of mind of a warrantied machine is nice, but saving $10.673 is also very appealing.
Hi Erik:
Warrantied usually means built by a 3rd party (HP, Dell, or a workstation integrator like Puget Systems, etc.). These companies charge for that kind of service, which makes the price difference between an iMac Pro and a PC much smaller. For HP I’d look into a Z6 or Z8, both of which can be customized with similar GPUs and options like a 10GigE card to get close to an iMac Pro (albeit without a monitor). Good luck – and thanks for watching.
I’ve got a Hackintosh that I had built for me a couple years ago. I’ve got three boot drives. One for whatever latest Mac OS comes out. One for an older version of the OS for Avid (until they update), and a Windows 10 boot drive (for anything I need Windows for).I prefer the Apple OS over Windows, but hate the Apple prices. If I could buy and HP workstation but run Apple OS, AND keep my warranty, I’d be a happy man.
Hi Michael, I would like to build a hackintosh to run only Protools12 on a single monitor, so I don’t think my video card would be very important at all, what would you recommend as a minimum for a card? thanks
Hi Bill:
I’d probably look into AMD cards, as that is what Apple is building into their computers. Tonymacx86.com lists them here: https://www.tonymacx86.com/buyersguide/august/2018/#(NEW)_AMD_Graphics_Cards . Good Luck!
hey Michael what a wonderfull vidéo and build i try to make the same but a little more tiny with a mini ITX (ASUS ROG STRIX Z370-G GAMING ) mother card. So my point is about bleutooth and Wifi does it work or need an extention carde / USB
Thanks!
I do not use Bluetooth, nor Wi-Fi on this system, so I can’t comment, unfortunately. Have you looked at http://www.tonymacx86.com/ ?
how is the Gigabyte Aorus Z390 board for hackintosh …
I used the ASUS ROG STRIX Z370-G. It’s been great! The only shortcomings: No Thunderbolt 3. I knew this going in; there just wasn’t alot of motherboards out there in that form factor that supported Thunderbolt 3.
Thanks for watching/reading!
Hello guys, i already installed hackintosh high sierrra 2 times before, but i am facing problem with hardware encoding is not enabled so my fcpx 10.4 is continuously crashes. Please guide what i have to do. i already tried many steps but cant able to enable hevc. I have gigabyte z170x mother board, i7 6700k with 16gb ddr4 ram, gtx750ti and 750w power supply. Thanx.