1. Dialogue Clarity
Way before I got into the tech pontification racket, I was an audio editor, I sat in heavily padded rooms listening to the same bits and pieces of audio over and over and over. I was trying to squeeze the most intelligibility out of audio clips as humanly possible. Often, just like picture editing, it was more triage than pure creativity.
And through those editing sessions as well as working with some fantastic auditory cowboys, I’ve come up with some tips to help you in post.
An important tip right from the beginning is that audio cleanup differs slightly from project to project. Different mics, different environments, and different on-camera talent change the exact settings and techniques for each project. A good chef starts with a recipe, and seasons to taste.
With that said, the first step is always Equalization. EQ is the most common audio manipulation tool in both audio and video editing applications. Knowing where components of human speech lie in the frequency spectrum is the basis for knowing what to adjust.
The first tool we’ll use is a parametric EQ. We’ll need to understand 3 things when working with this tool: first, the frequency (expressed in hertz and Kilohertz), the gain or volume (in decibels), and the Q – which is how wide the changes to the volume and frequency will be.

Understanding EQ Parameters
Next, we need to know where the components of human speech fit in. I’ve got this handy dandy chart to use as a guide. While all speech is slightly different, it does give you a starting point on what frequencies to adjust.
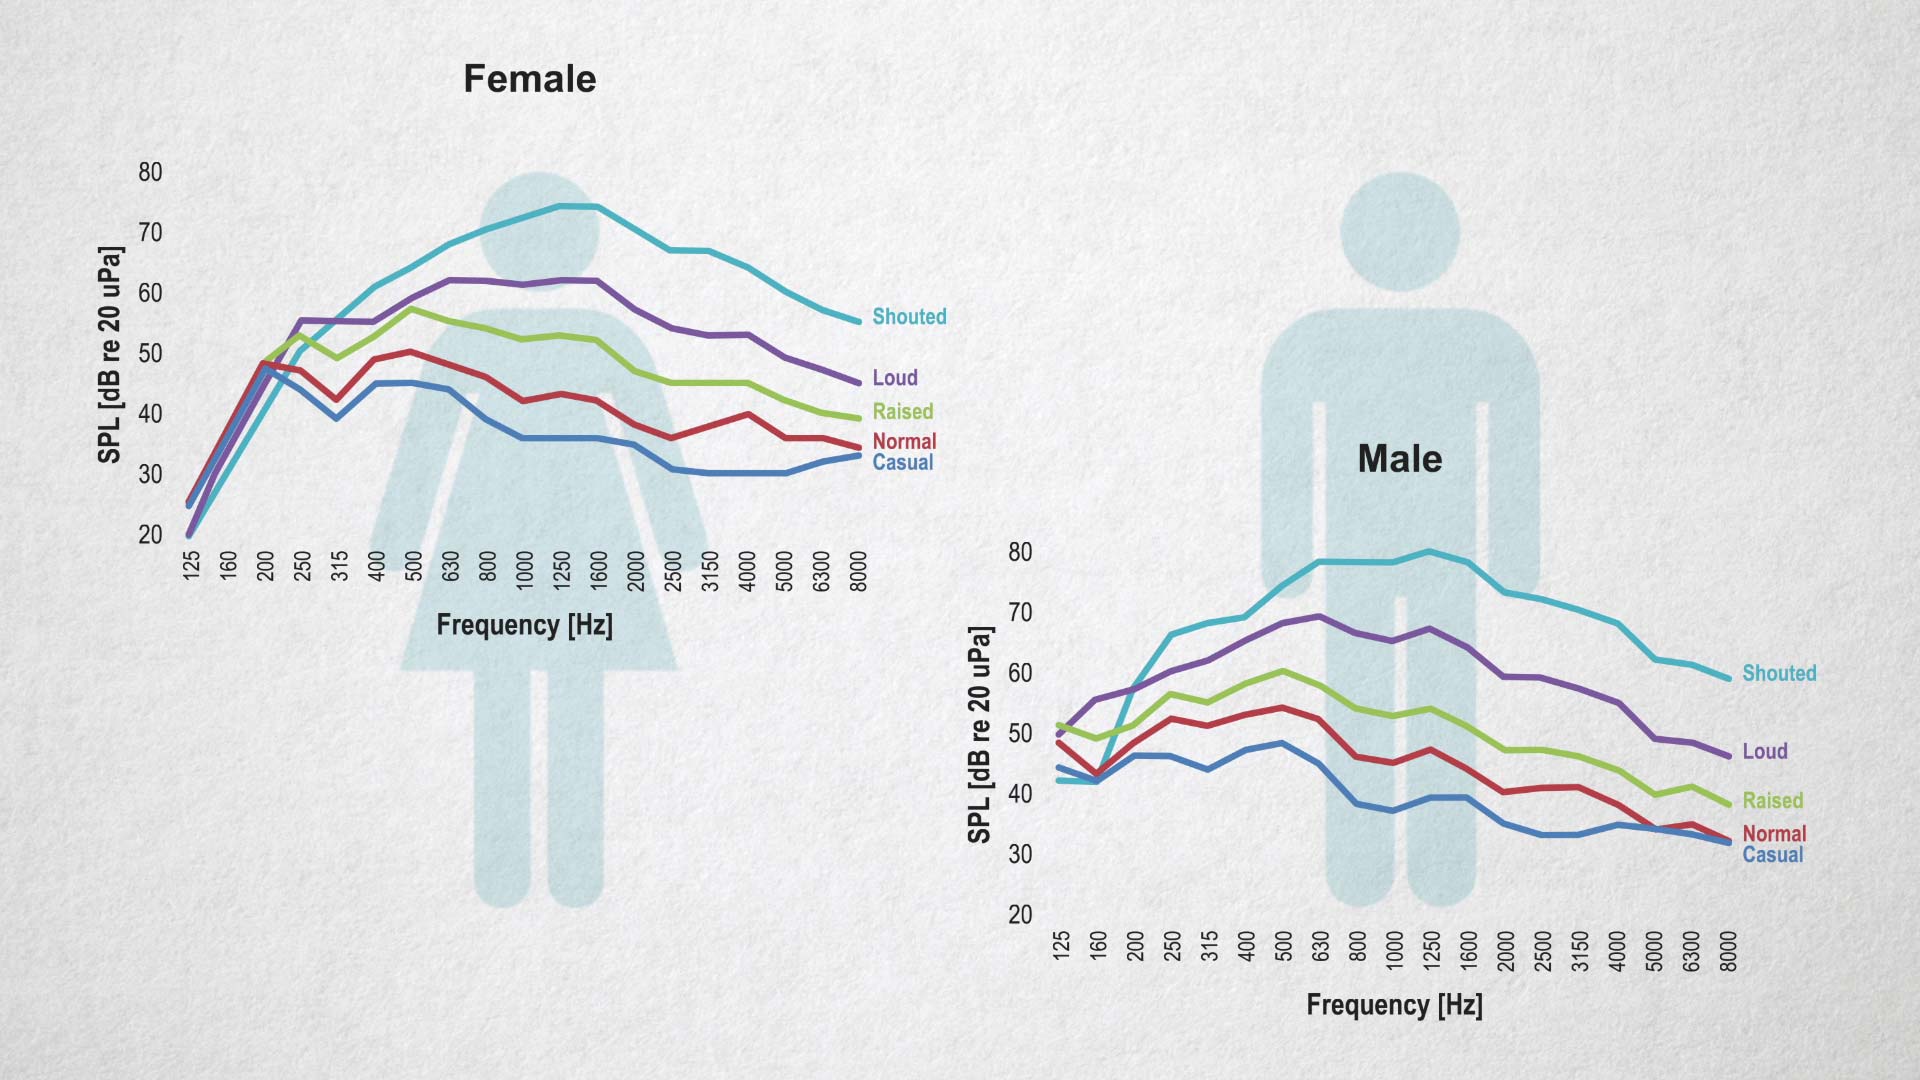
Where male and female speech falls in the frequency spectrum.
You can add intelligibility of words by boosting the frequencies of where most consonants are spoken. This usually falls around 1.75kHz. Adding a boost of +3dB and a Q of 1 can help out some. Experiment in this area and see what works for your clip. Again, season to taste.
With some voices, move the frequency to adjust up to the next octave of most consonants, that is, 3.5kHz. Do your magic there, but be sure to either choose 1.75kHz or 3.5kHz, not both.
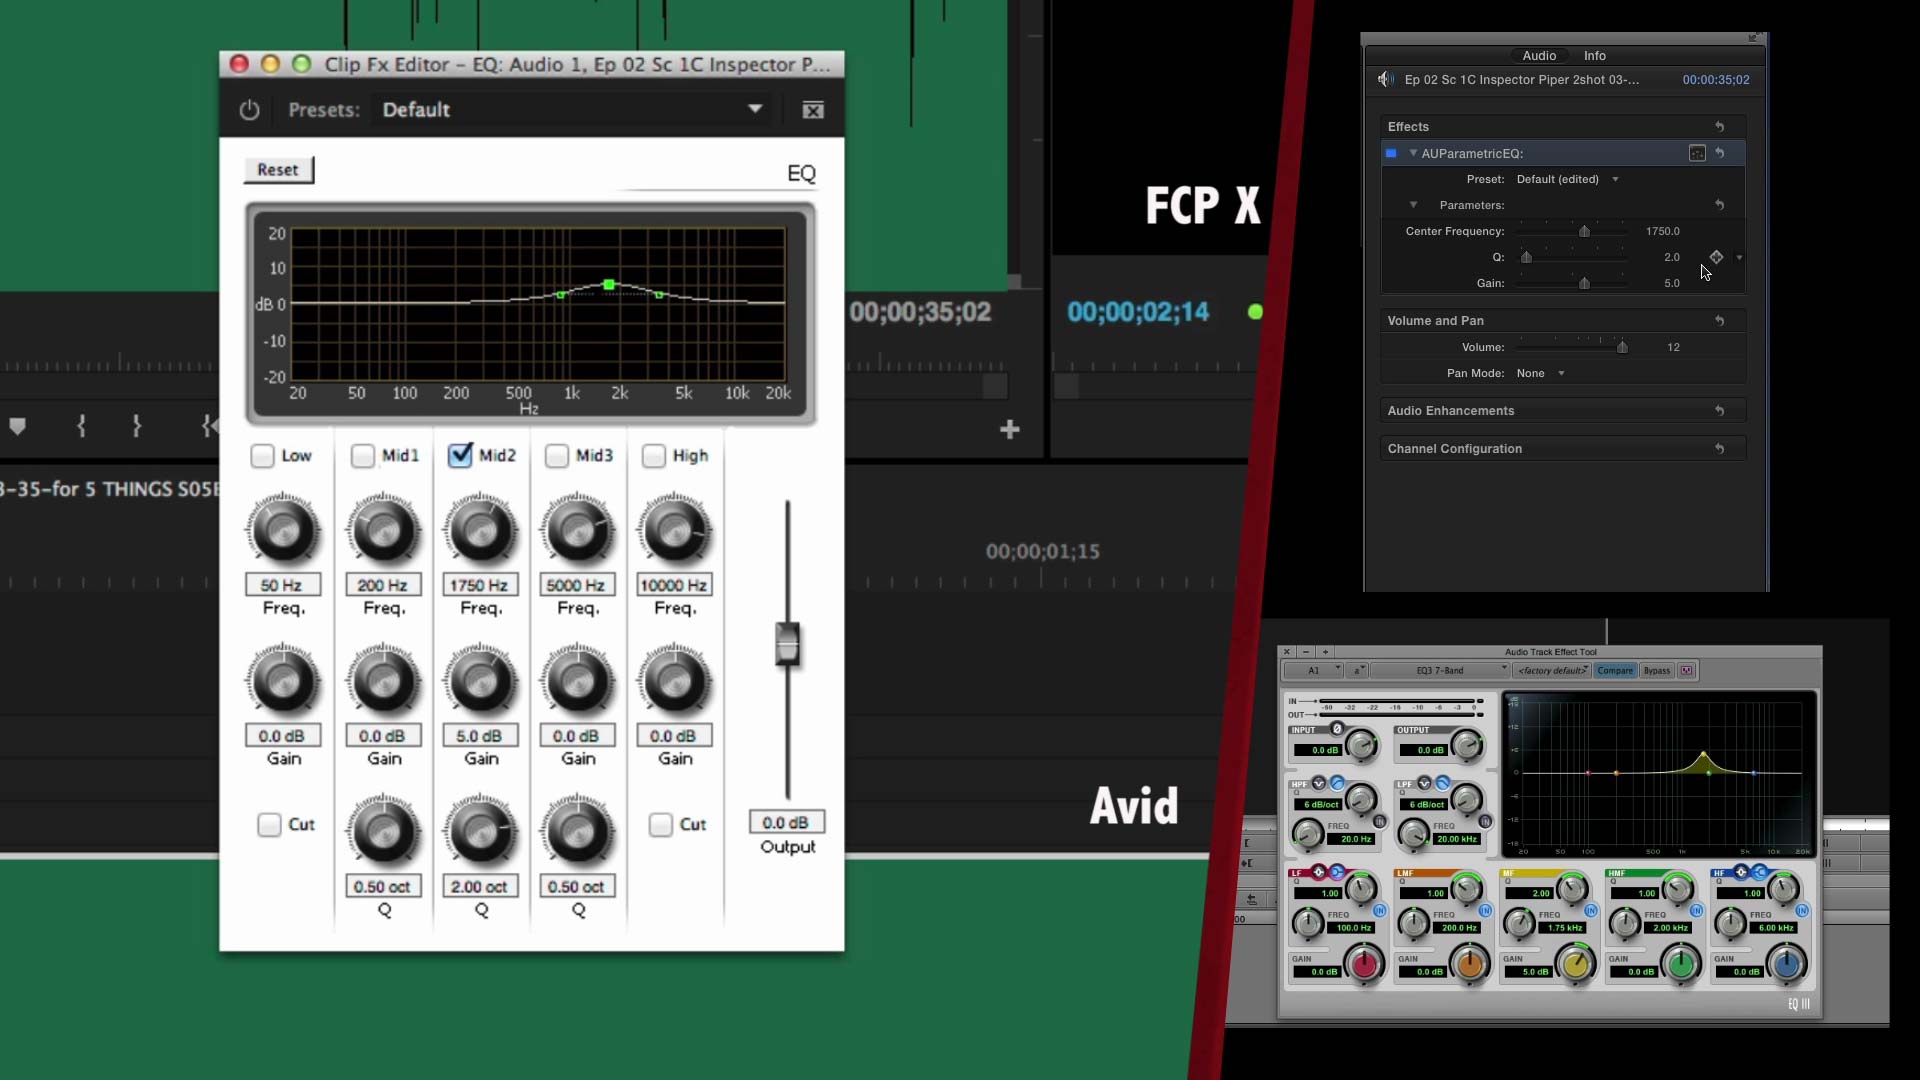
Helping out consonants in Adobe Premiere Pro, Avid Media Composer, and Apple FCP X.
We also should use de-essers to reduce the amount of Sibilance in our dialogue. We want to remove those wet, spitty “S” sounds, so they sound, well, less spitty. Most NLEs have filers built-in or, these filters are available by 3rd parties.
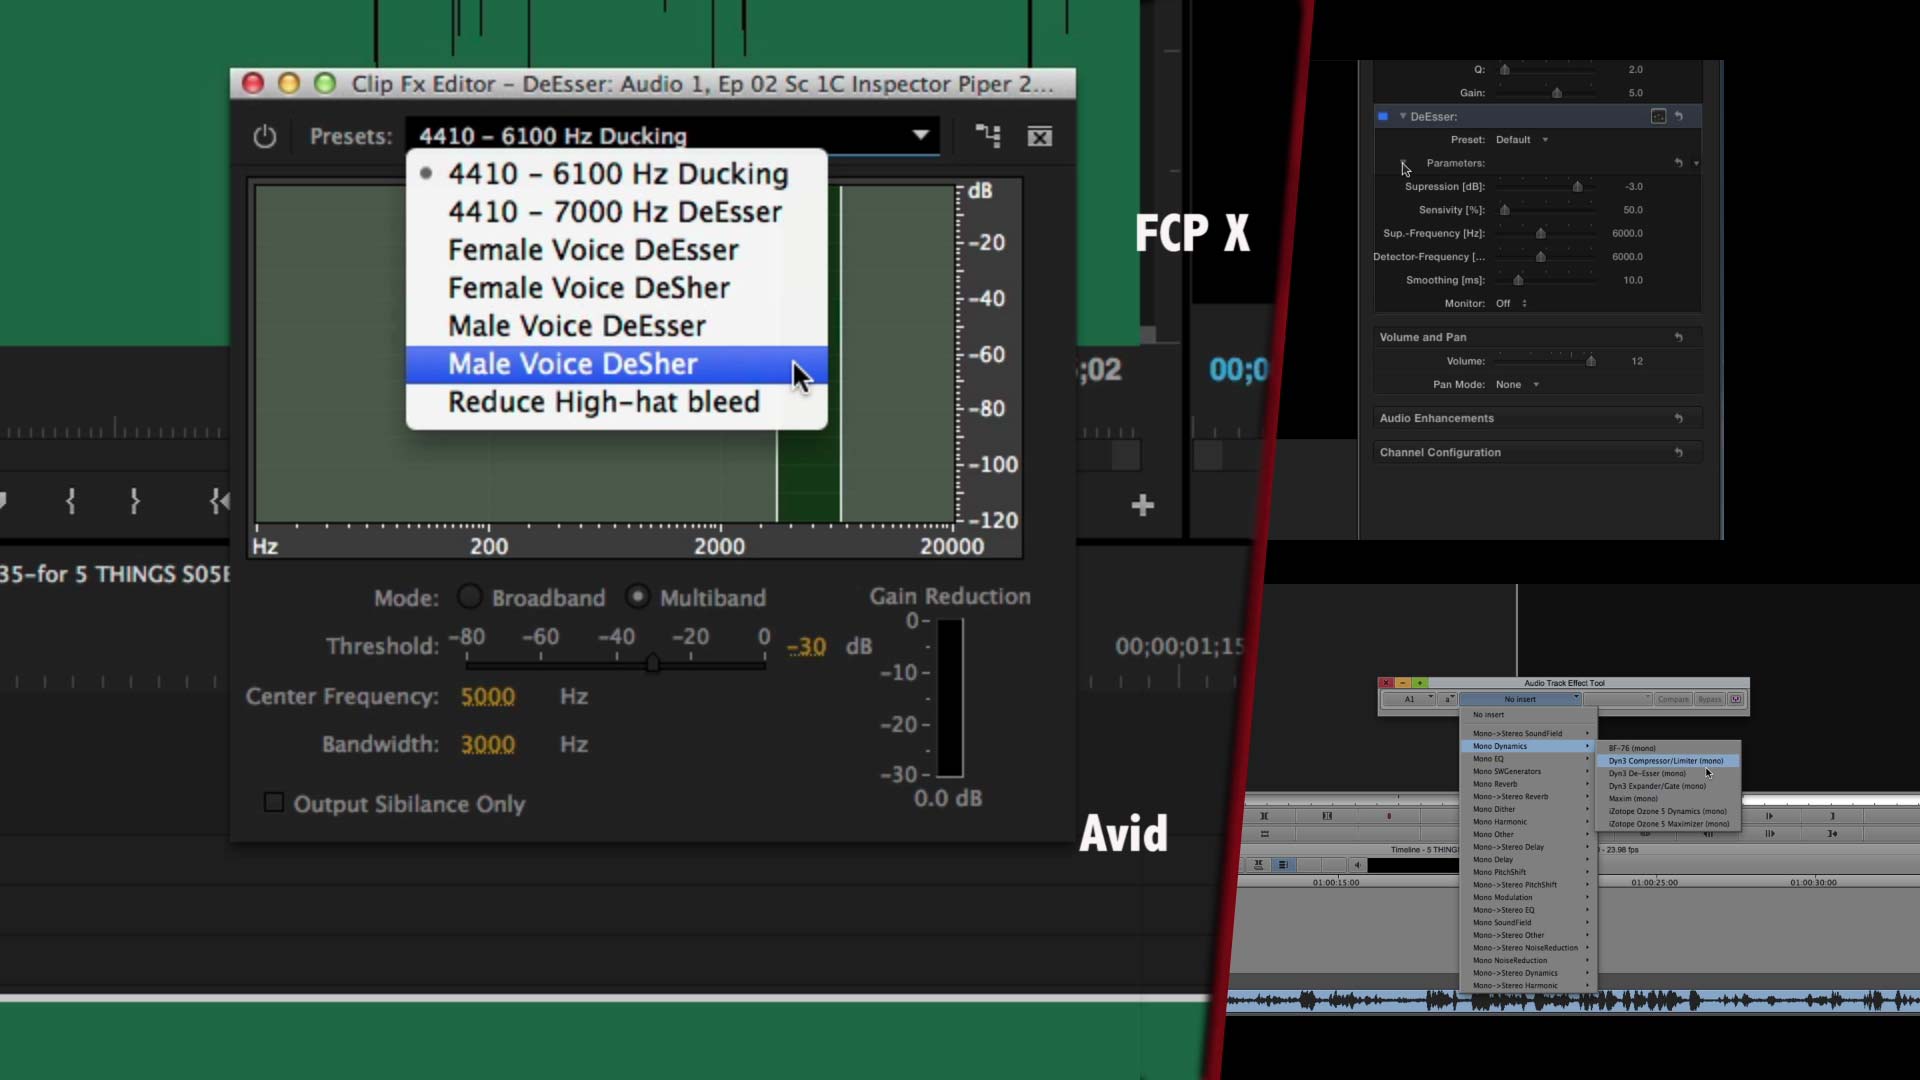
The de-esser, built into Adobe Premiere Pro, Avid Media Composer, and Apple FCP X.
Lastly, as if “S’es” weren’t bad enough, we often get poppy on mics when we use P’s and B’s. We can reduce these by selecting them in your waveform and using a high pass filter at 150Hz or so. Again, season to taste.
2. Noise Reduction
More often than not, you’re going to get audio that was recorded in less than ideal conditions. We can rely on our old friend EQ to help here, too.
First: A common issue is that your shooting location can be boomy. While this won’t help with reverb – I’ll cover that later- you can minimize some boominess by adjusting the frequencies between 200 to about 400Hz. A -3dB dip and a Q of about 2 or 3 is a good start. I’d set the negative gain as high as possible until you find the exact offending frequency, then return to -3db and experiment from there.

Reducing BOOMSTICKiness.
If the dialogue has some noise in the lower ranges, try using a high pass filter – that is, a filter that only lets the high frequencies through. For bros, try a sharp highpass around 130Hz, and for the ladies, start around 200Hz.
If there is noise in the higher frequencies, try another type of filter called a low pass, which is – you guessed it – a filter that only allows low frequencies to pass. Start around 8Khz. And adjust from there.
The availability of noise reduction tools has become widespread. Many NLEs have at least some noise reduction built-in, and 3rd party tools have dropped in price. Many incorporate many of the techniques and tools we’ll discuss today but also have used some variant of noise print identification.
This concept involves teaching your plugin what you consider to be undesirable audio – such as an air conditioner or hum. Once the system is taught that this is bad, the plugin can then reduce audio that shares those same characteristics.

Izotope RX De-Noiser
3. Reducing Reverb
Reverb is everywhere. You’ve probably enjoyed it while in the shower, as the hard tiles and surfaces in the bathroom give your angelic voice a beautifully produced sound. But often, we don’t want that in our dialogue. Reverb, or its cousin echo, can make our dialogue-less clear, and differences between reverbs can instantly take a viewer out of a scene. Let’s see what we can do about that.
The first thing you need to realize is that reducing – let alone removing – reverb is one of the hardest things in post audio to do. More often than not you’re only making subtle changes and hoping it’s enough. Also, you’re often combining techniques for that little bit of improvement, so it’s easy to get lost along the way.
There are some tools to know.
First, subtle use of a gate– that is, audio filters that only allow audio at a certain volume to pass – may work for you. A good way to think of a gate for you video people is that’s it’s the audio equivalent of a luminance key.
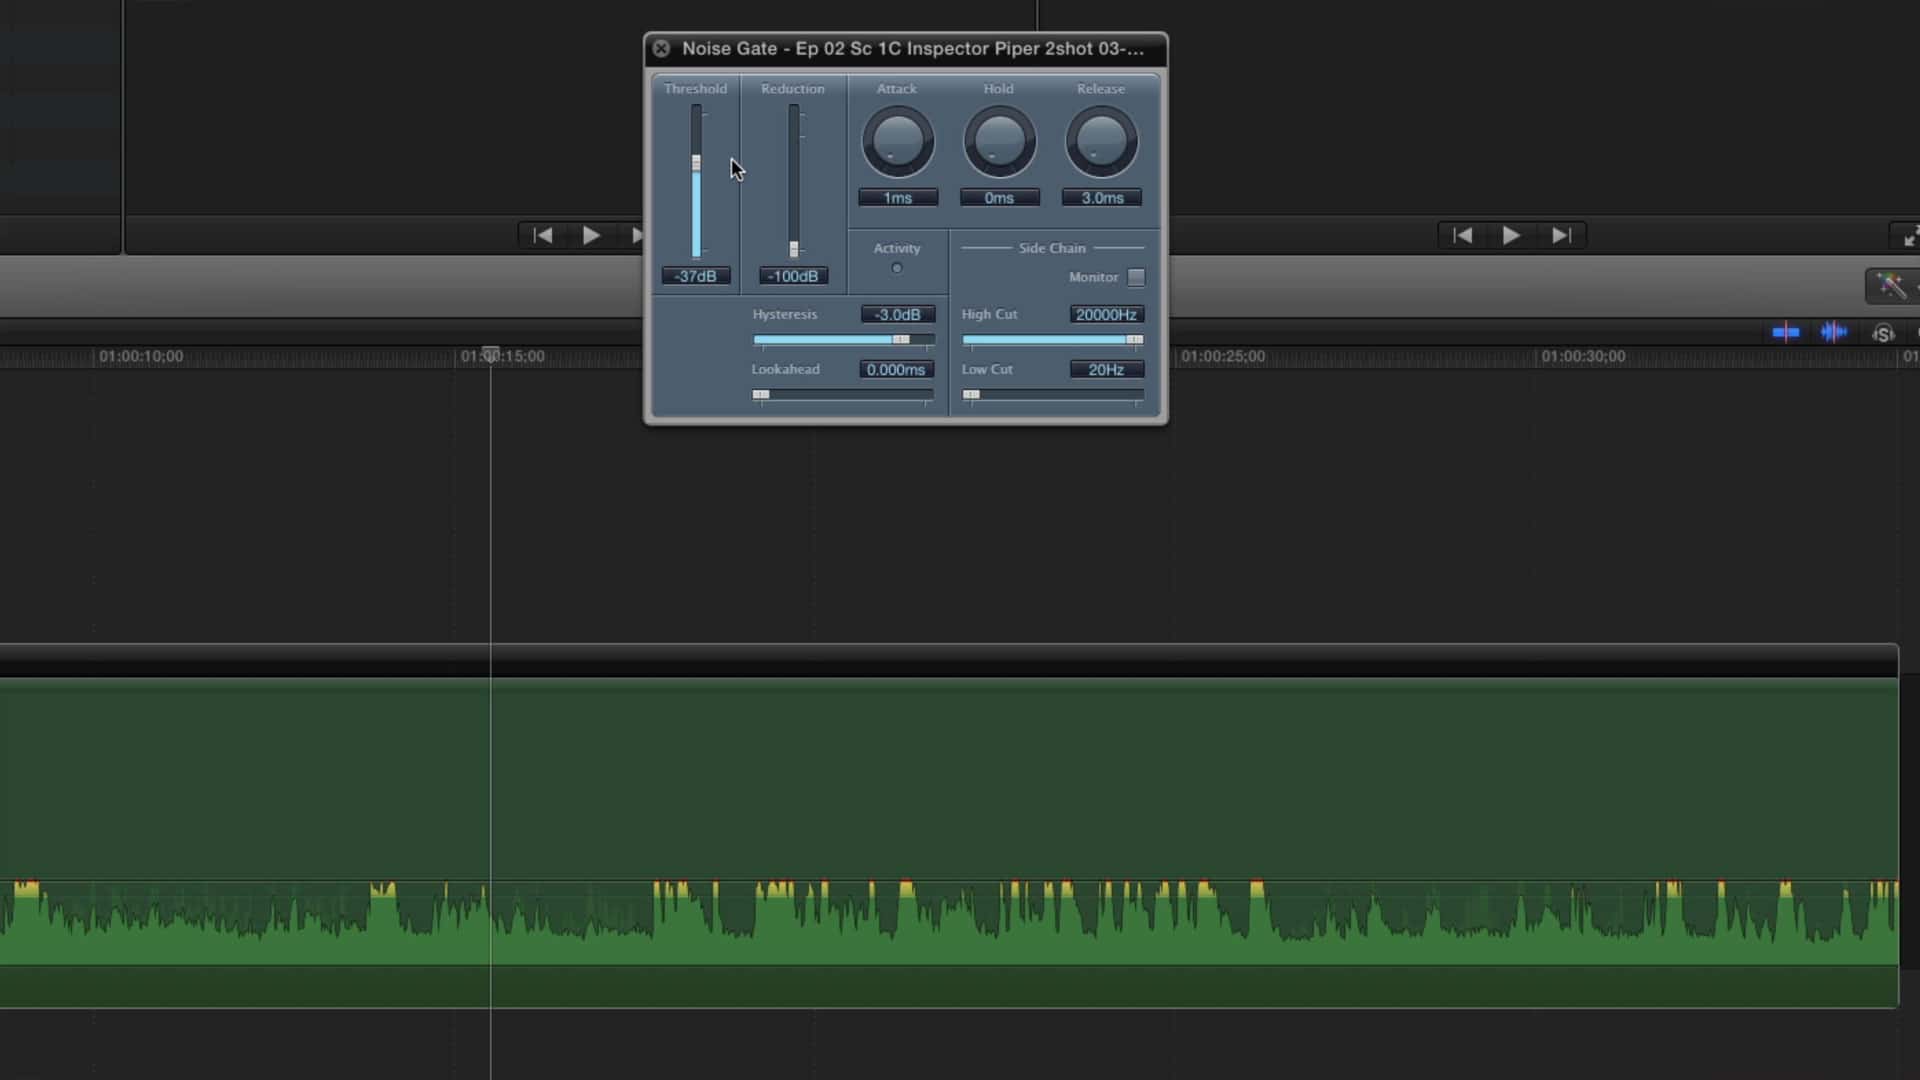
Example of a gate found in FCP X.
Also, expanders are incredible tools. Expanders are filters than increase the volume difference between loud and soft sounds. For noise and reverb, you’ll want to experiment with downwards expansion to lower the relative volume of the softer sounds, in this case, the tail of the reverb.

Example of an expander found in FCP X.
Now, 3rd party plugins are a great way to augment the tweaks you’re already making. I’ve used Zynaptiq Unveil on several projects and it’s pretty good, although you need to tweak it a bit more. Izotope has a de-re-verb plugin in their RX package that’s good and pretty intuitive.
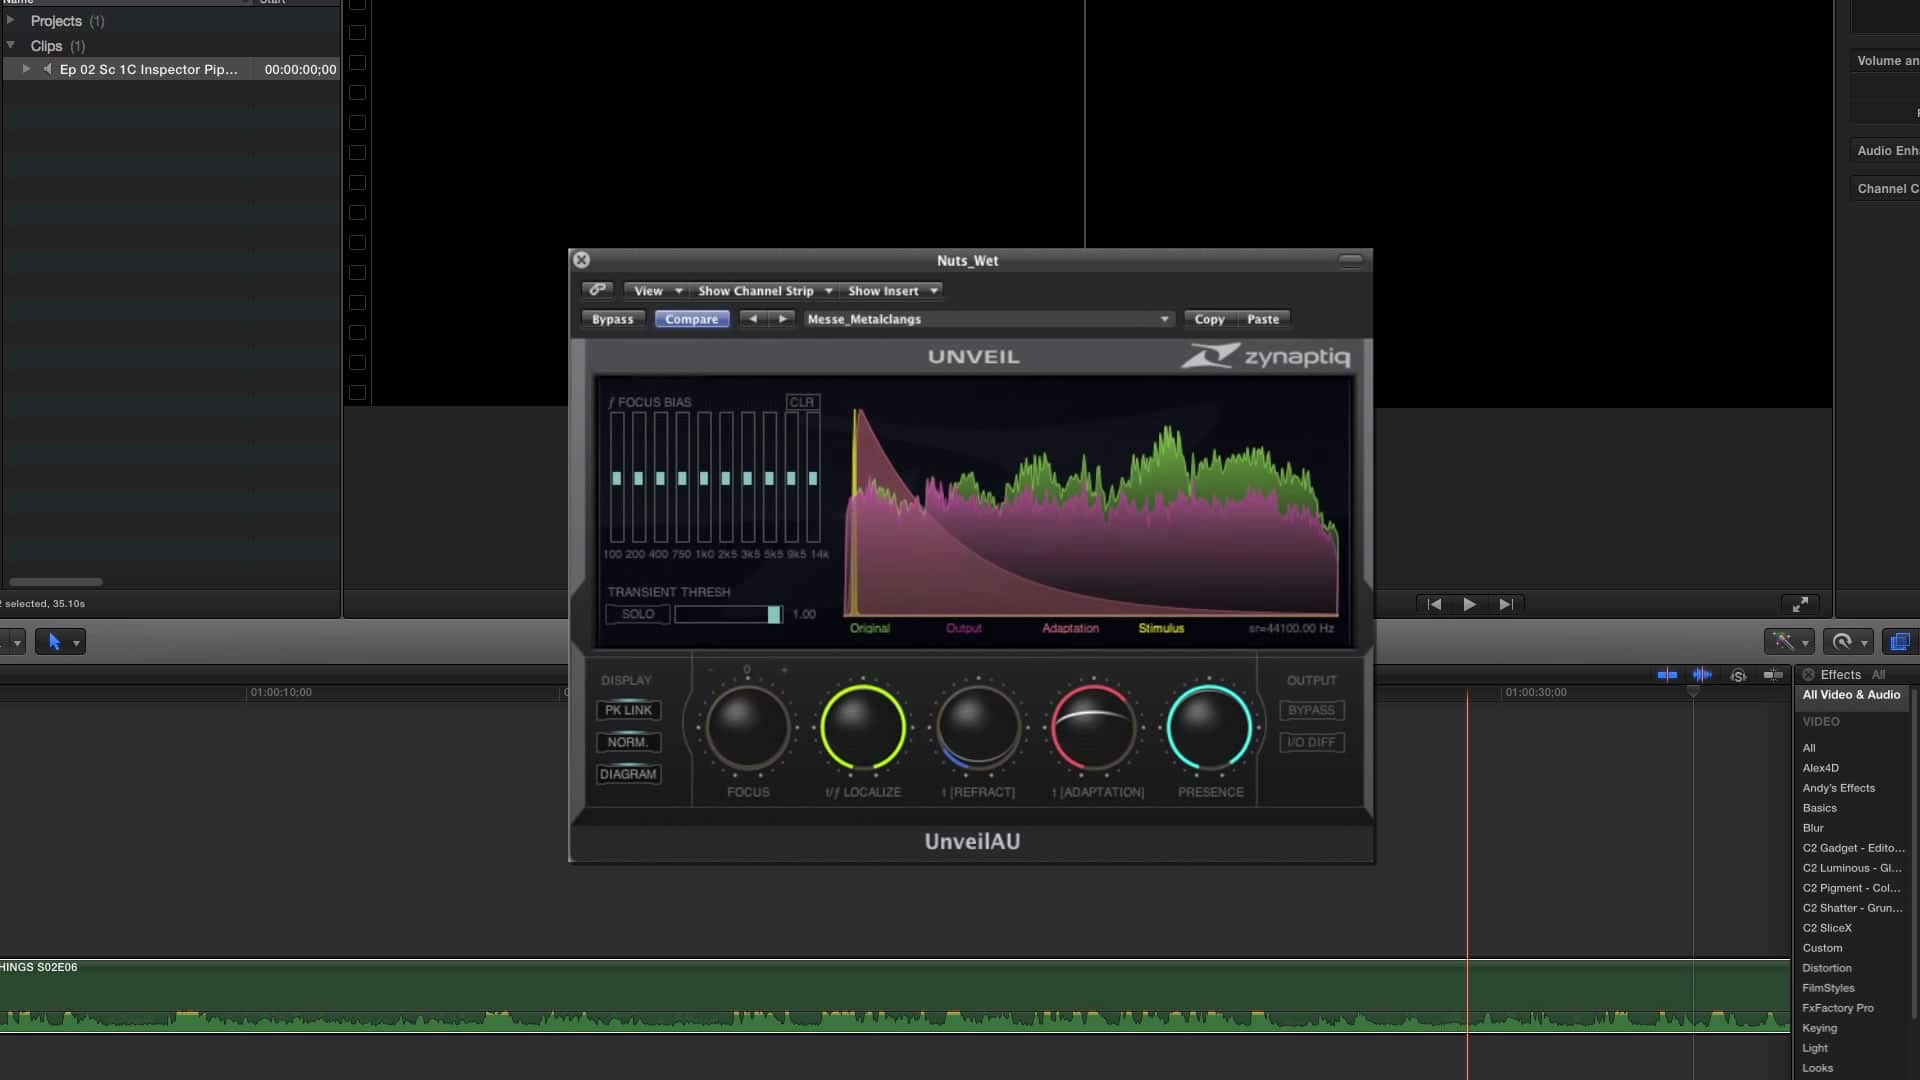
Unveil, a de-reverb plugin by Zynaptiq.
I can’t stress this enough: improving your audio using these tools to reduce reverb – even with otherwise pristine dialogue – will be slight at best.
4. Levels and Placement
Dialogue should not be competing with other elements of your mix. After all, the dialogue is being said for a reason, and we need to ensure that it’s heard. There are some things we can do to that end.
Unless there is a specific aesthetic reason not to, dialogue should be mono and panned dead center. Why? First, having the dialogue into a specific place in the sound field helps it not be muddied with other audio in the same field. Separation. It also causes the viewer to focus front and center. If the dialogue was off to the side or changed depending on what character was talking, you may be inclined to pay more attention or even look to that side. We want you front and center in most situations. Secondly, all sound systems can always play mono, so you’re guaranteed compatibility across systems.
Keep your dialogue centered.
If going to TV, then we have a little thing called standards, which contains the requirements each network has to guarantee the finished programs they’re delivered will look, sound, and play properly. To get started, look up the PBS Redbook online.
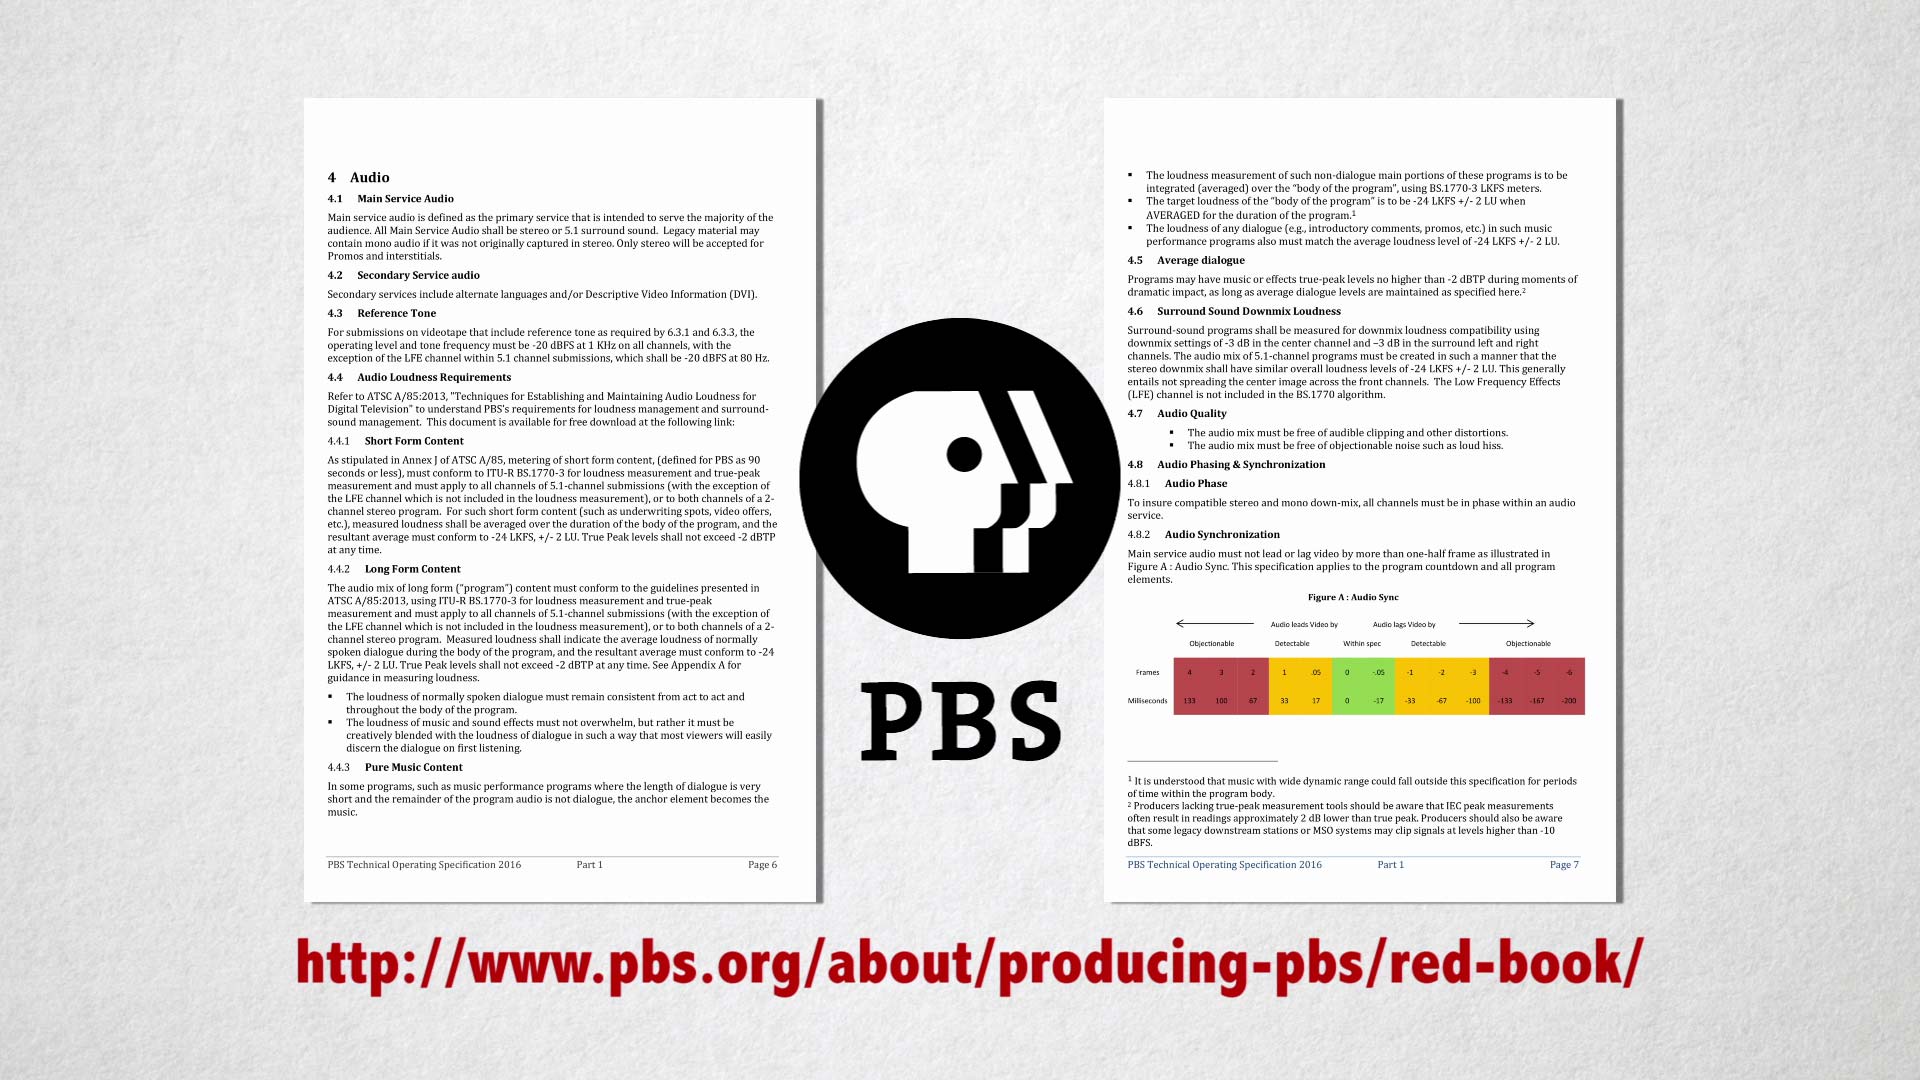
PBS Red Book.
Within these specs are audio levels. While this doesn’t tell you where your dialogue needs to be exactly, it does tell you how loud and how soft your overall mix can be, and obviously, your dialogue has to fit within that. Normally, this is -24 dBfs and true peak -12 dBfs.
Not sure what dBFS – decibels full scale is? Check this out. And keep in mind, dBFS is NOT dB; which is the usual volume indicator in your NLE. These values are also very close to what VOD platforms like Netflix will want. However, always ask for the deliverables spec when delivering to these outlets, as their specs can change which could cost you money and time if you fail QC.
More often than not, your work is going to end up on the public web. This presents several problems: Mainly, what are people watching on? Is it a smartphone and a pair of headphones, or a smart TV hooked up to a home theater system? Because of this, there is no set standard. This means we need to find a common denominator so that the fewest amount of viewers will have to adjust the volume knob on their devices.
I normally aim for my web mixes – that is, YouTube, Vimeo, etc, to be peaking at -2 or -3dB. This means dialogue should not exceed here at peak. Often we can accomplish this by using a compressor, which is included in most NLEs.
Again, we want to maintain high enough volume so what you’ve designed is understood, but not have such dynamic range that things are missed….or have viewers constantly changing volume.
5. Last Tips
Here are some rapid-fire tips that may help you as well.
First, listen at the same volume in your editing fortress of solitude. If you’re constantly fiddling with the volume knob on your speakers, you’re never going to get an accurate idea of your mix and how elements relate to one another – which is the basis of any good mix. You can pick up an inexpensive sound meter at Radio Shack and play tone through your speakers to set your volume levels.
Secondly: Your editing room. While not all of us can have sound dampened edit bays, consider doing something to your creative cave. By dampening the room with uneven surfaces, blankets, rugs, or even Auralex pads, you can reduce the reverb and slapback in the room, and thus not cloud your judgment. This is similar to why color grading bays having neutral colors and lighting – anything they can do to remain objective, the better.
Lastly, remember that not all audio tweaks are better. Accept the fact that something’s just sound different, not necessarily better.
Have more sound concerns other than just these 5 questions? Ask me in the Comments section. Also, please subscribe and share this tech goodness with the rest of your techie friends.
Until the next episode: learn more, do more – thanks for watching.
Bonus:
Thanks to Izotope, we have this:
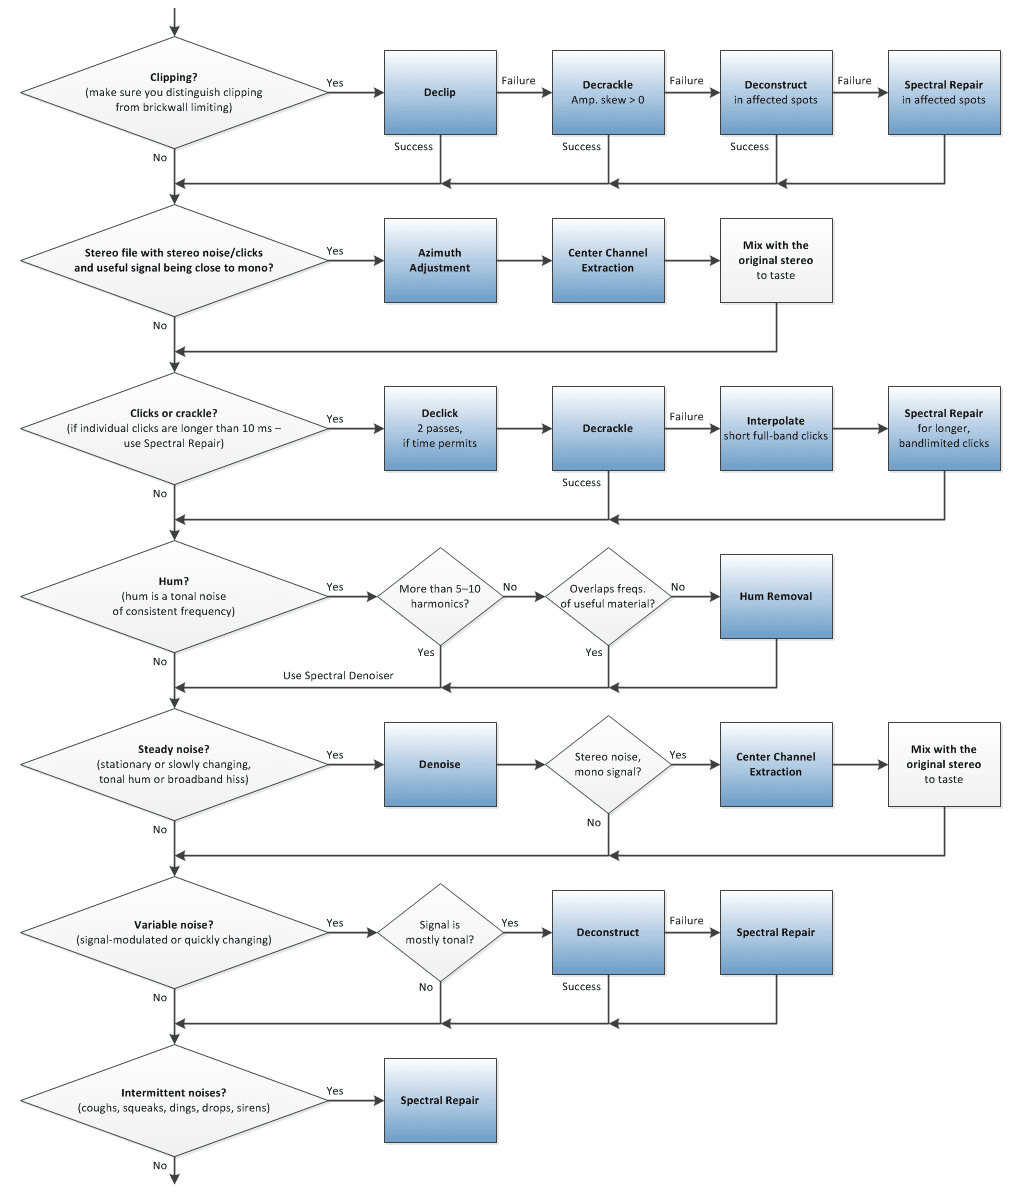
Audio Issues: Use this flowchart to troubleshoot
Great info and easy to follow.
I would like to know if this the order to follow when doing the post.|
Thank you.
Good Question, and it’s a rather complicated one. Generally, the answer is yes. As I mentioned, audio is like cooking, you need to season to taste and make changes on the fly. EQ is usually your first step. It’s a built in tool, and easy to change and can get rid of alot of problems. Next: Reverb. You don’t ways need to use reverb reduction (sometimes you need to add it!). This may be done before or after noise reduction, as you may find the results better transposing the two. Sometimes, action in the scene SHOULD be heard, in which… Read more »
Great explanation of audio tweaking. Thanks Michael!
A good overview of the process. Seeing the steps you take, along with the specific frequencies you target is very helpful!
Good read on Audio !